• Skip to primary navigation
  • Skip to main content

Western Chandelier

  • Buying Guides
  • Styles & Trends
    • Bathroom Lights
    • Ceiling Fans
    • Ceiling Lights
    • Lamps
    • LED Lights
    • Outdoor Lights
    • Smart Lights
    • Wall Lights
  • Wellness & Safety
  • Shop Products

admin

How to Choose the Right Recessed Lights for Your Home : An In-Depth Homeowners Guide

How to Choose the Right Recessed Lights for Your Home : An In-Depth Homeowners Guide

by admin · Nov 22, 2023

Recessed lights go by many names, such as downlights, pot lights, can lights, and puck lights. No matter the name, they all refer to light fixtures that are installed inside (recessed into) your ceiling. They shine light into the room without hanging down into the space like a chandelier or a flush mount fixture. 

There’s a lot to know about recessed lights before you install them in your home, but it can be hard to find all of the information you need in one place. So we’ve put together this handy guide with everything you need to know in one place to help you decide which recessed light is right for you!

Recessed Lights 101

Before we get into the nitty-gritty details, here’s a quick overview of some of the most important terms you need to know when shopping for recessed lighting.

Recessed Lighting Terms

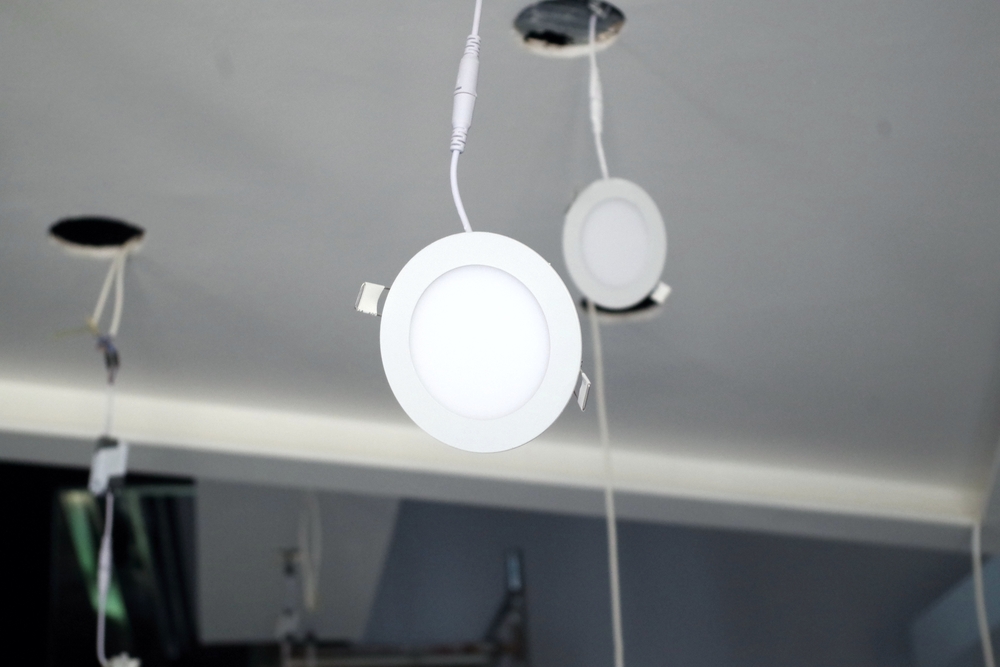
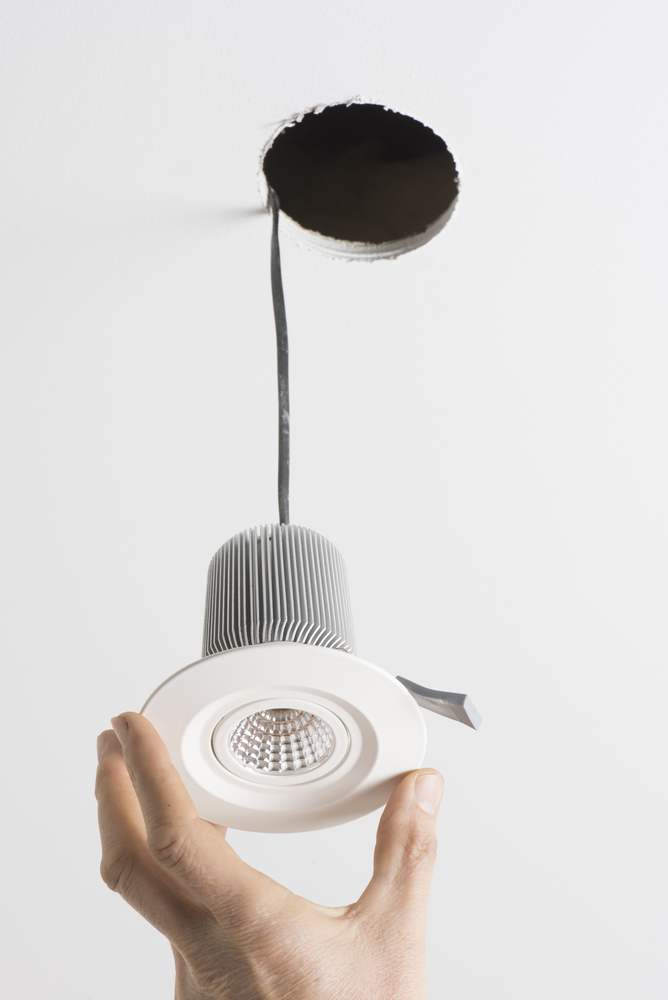
There are three parts to a recessed light: the housing, the bulb, and the trim. The housing holds all of the wires and connectors inside a protective case that sits inside your ceiling, out of sight. The bulb is the part that gives off light. The trim is the visible portion of a recessed light that covers the housing and the hole in the ceiling, giving it a finished look. 

You’ll also need to pay attention to how widely the trim allows the light to shine – this is called the Beam Angle. Recessed light beam angles can range from a narrow 15-degree spotlight to a 120-degree floodlight. Generally speaking, anything from 60 to 120 degrees will work well for general lighting in your home.

Types of Recessed Lights

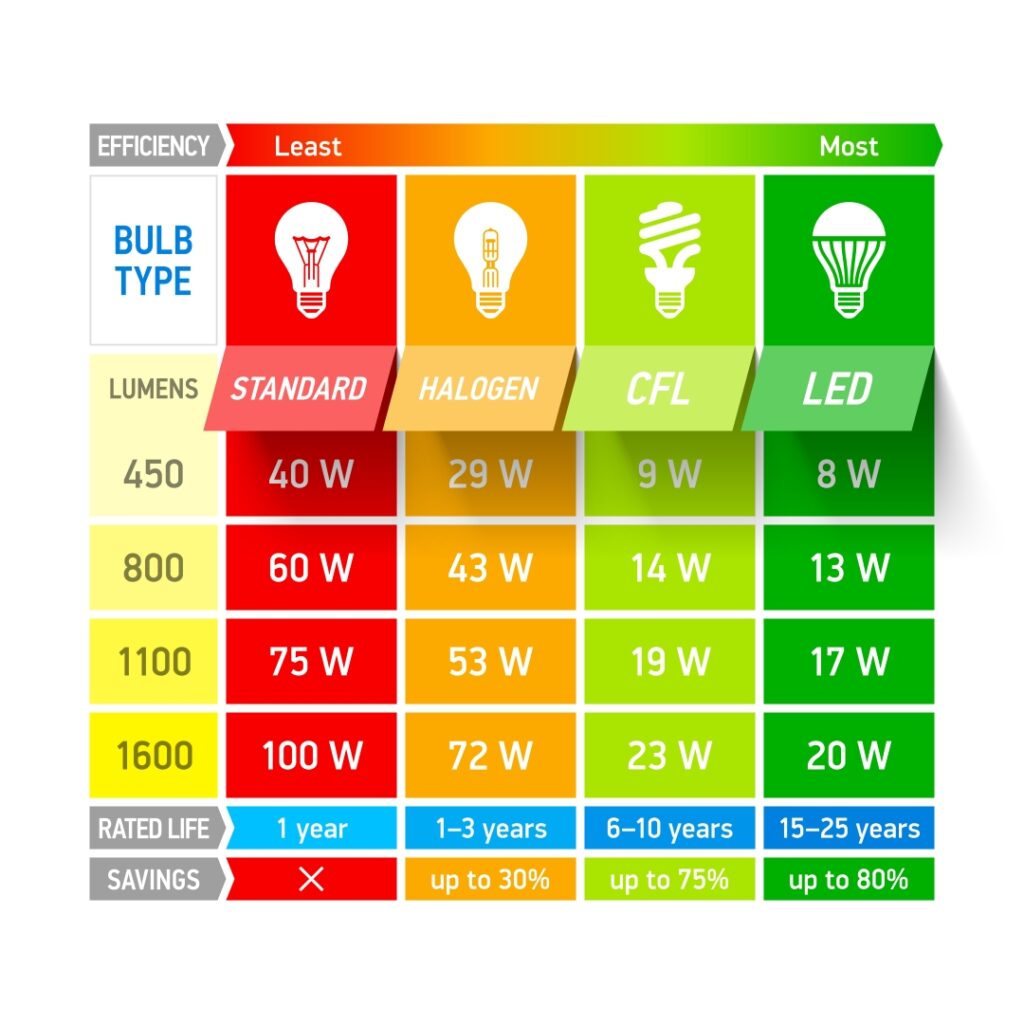
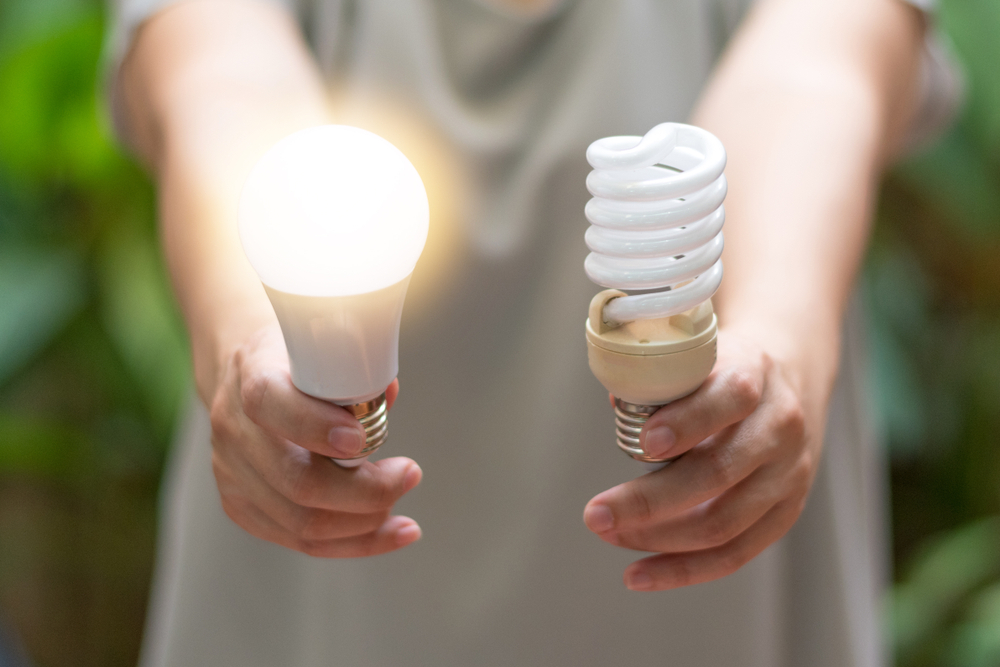
Traditional – These are the original recessed lights. They’ve been around the longest, but they have their pros and cons. They’re cheaper to purchase but more expensive to operate than LED options. They also produce heat, so you’ll need to be conscious of location.

LED – These newer recessed lights may cost more upfront, but they use considerably less power to run, which makes them cheaper to use. LED bulbs last for a very long time, so you won’t have to pay to replace them every year. They also produce minimal heat, making them a safer alternative to traditional lights. 

Ultra-Thin / Canless – These are a small subsection of LED recessed lights that have been designed specifically for use in remodels. The housing in these recessed lights is about as thick as drywall, so they’re much easier to install in an existing ceiling.

Ease of Install

If you’re replacing an old recessed light with a new one, installation is a pretty basic homeowner DIY. If you’re trying to add recessed lights where they weren’t before, that’s usually a much larger project. 

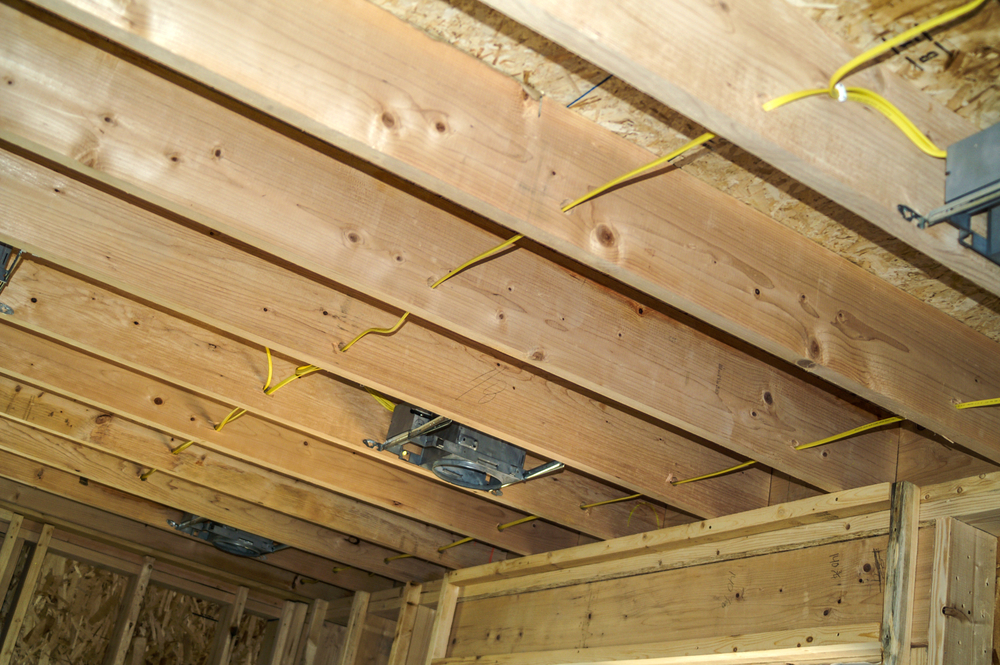
Recessed lights typically have a large housing, which means they need to be installed between the framing lumber in your ceiling. In new builds, this isn’t a problem because the spacing of your lights can be planned out during construction. If you’re installing recessed lights after the fact, creating an evenly spaced grid of lights can be a little bit more difficult. You’ll likely need to hire an electrician or contractor to help run the wiring correctly.

Canless lights are often the best choice for renovations because they can be installed almost anywhere in the ceiling. While easier to install, it’s still a pretty significant electrical project. If you’re comfortable with that type of DIY work you can give it a try, but most homeowners usually hire a professional.

Sizing

Homeowners are often surprised at the size of their recessed lights after they’ve been installed. It’s important to know that the measurement on the packaging of a recessed light refers to the size of the light’s housing, not to the size of the trim.

The measurement on the packaging tells you how large the hole will need to be in your ceiling so that you can plan out your spacing. You’ll also need to take into account the size of the trim.

Remember, the trim on a recessed light is there to cover the edges of the light and the hole, so it sits below the drywall and extends out from the fixture. Because trim styles vary, a 4” recessed light could appear 5, 6, or even 7 inches wide once installed.

Make sure you double-check that you measured the right part before you cut, or you could end up with a lot of drywall patching!

How to Choose the Right Size

Recessed lights come in a lot of different sizes, but the 6” size has been an unofficial industry standard for a long time. Now, with LED technology, manufacturers are finding ways to create the same amount of light in smaller packaging. Their smaller 4” counterparts pack a pretty big punch for their size, and they just might end up being a better fit for your space.

Light Coverage 

If you’re lighting an entire room with recessed lights, both 4” and 6” sizes will do the job well. They are pretty interchangeable as a general lighting option, but there are a few things to consider.

Ceiling Height: You’ll need to consider the height of your ceilings. Both 4” and 6” work well at standard ceiling height. For vaulted ceilings, you might want to consider sticking with larger lights with wide beam angles – the taller the ceiling, the more evenly diffused the light will be across your space. 

Existing Fixtures: If you’re adding recessed lights to work together with an existing light fixture like a chandelier or a ceiling fan, take stock of the way the existing fixture lights the space at different times throughout the day and at night. 6” recessed lights can help raise overall ambient light if the room is too dim. 4” lights are often a better choice if you need lighting around the dark edges of a room. 

How You Use the Room: The rooms in your home don’t need an equal amount of light in every square inch. Your rooms will feel better if the lighting is tailored to the way you use them. 

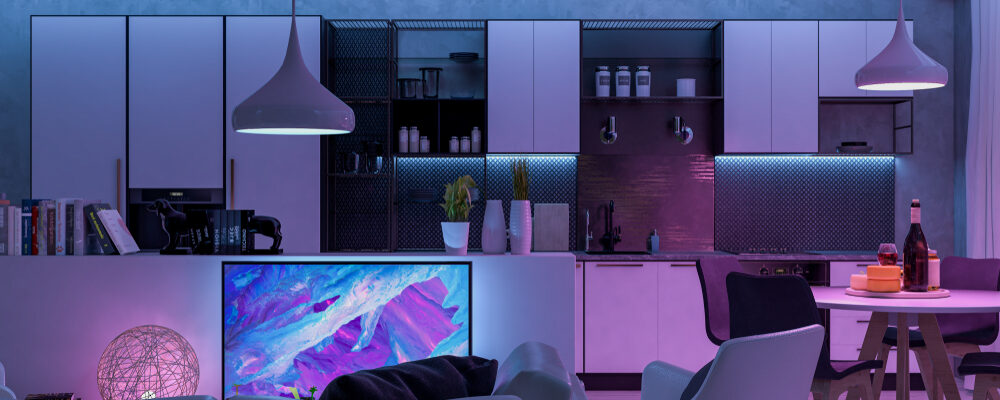
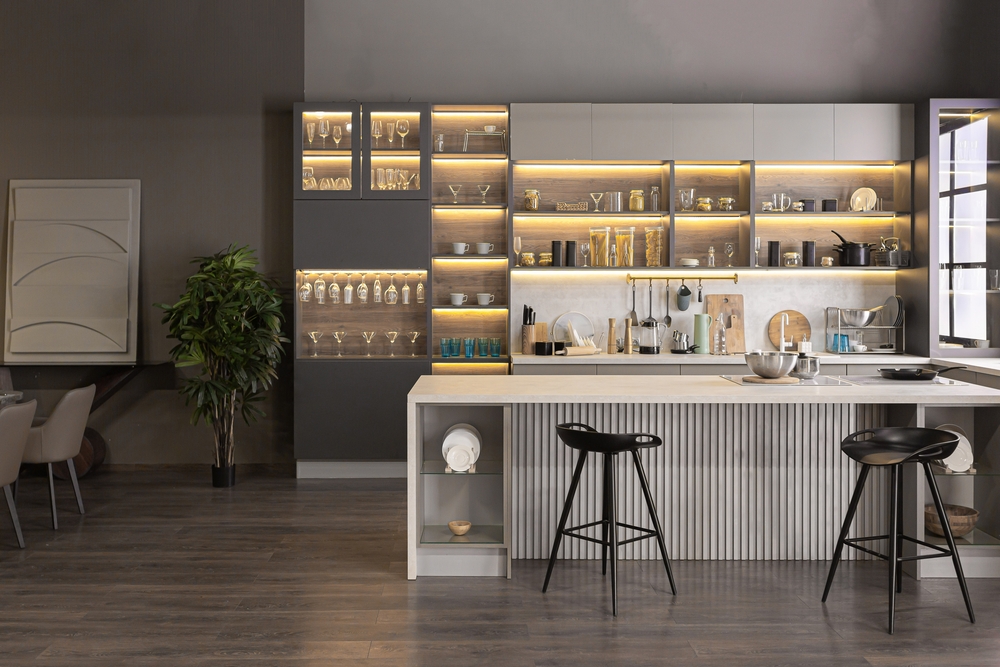
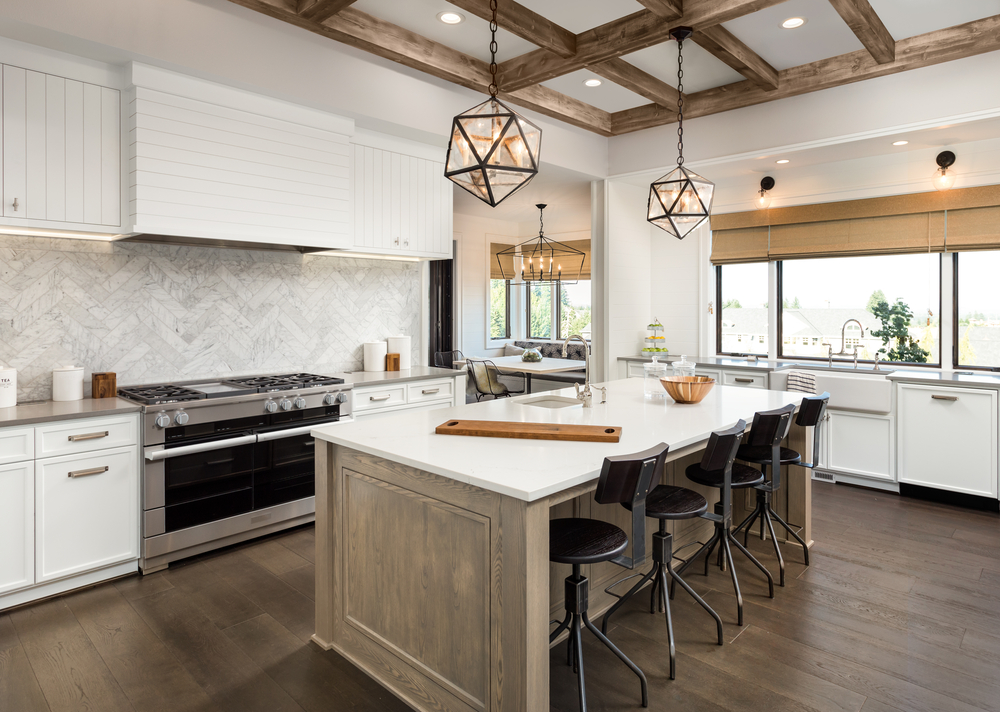
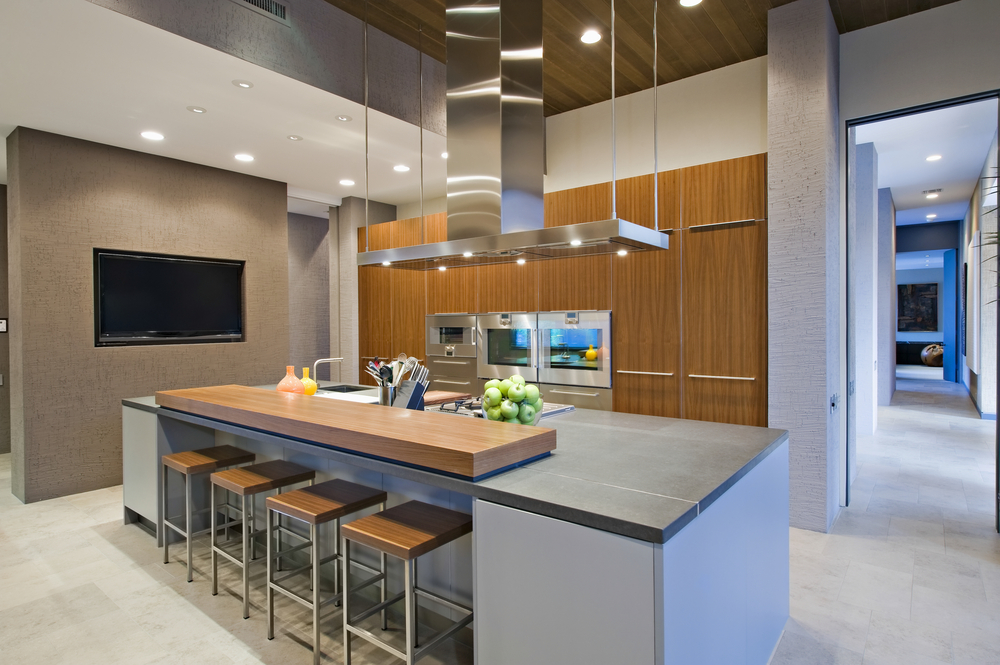
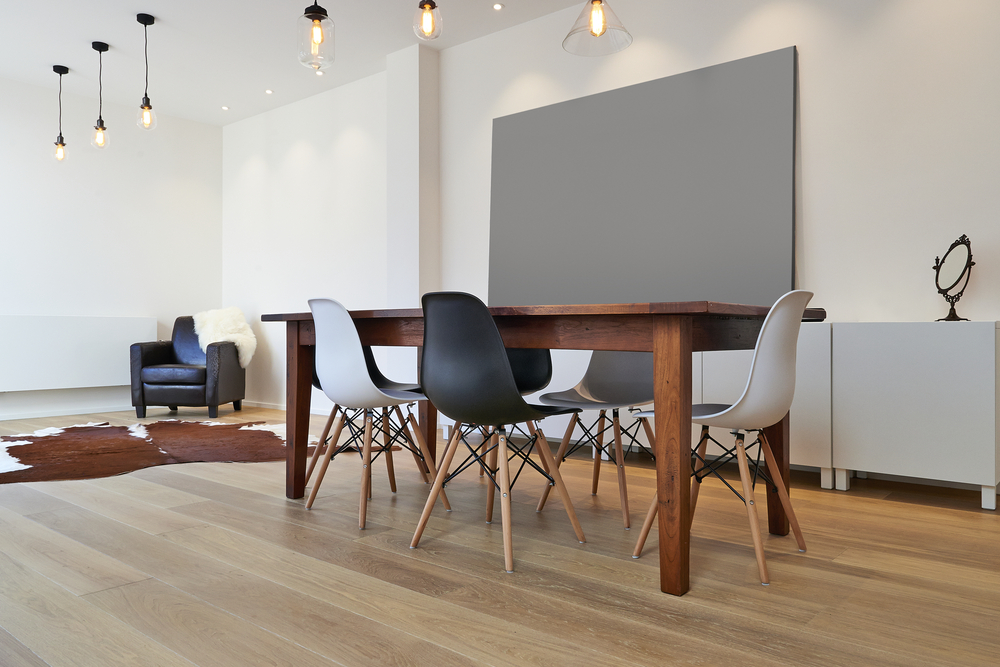
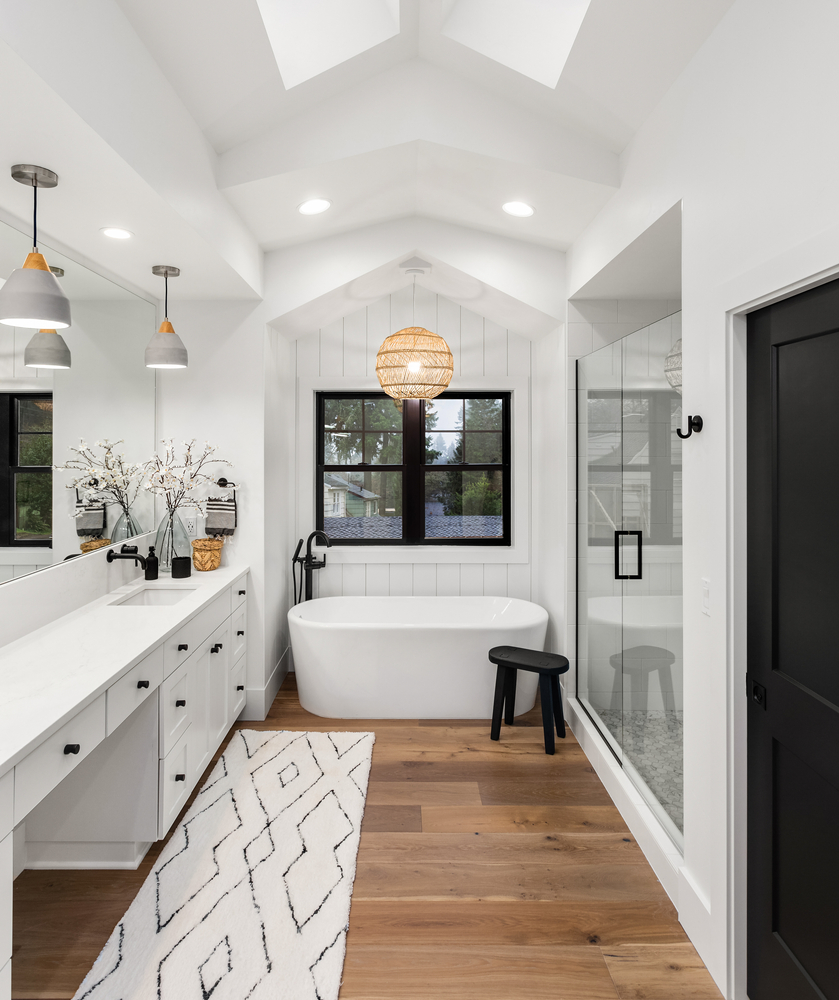
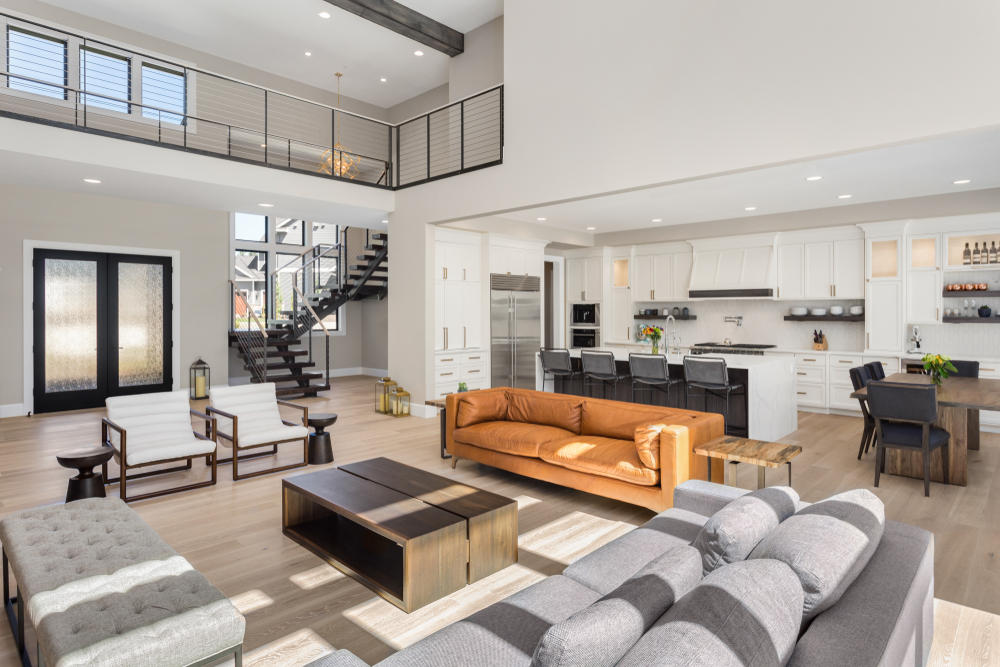
For example, this kitchen has beautiful pendant lights, but on their own they’d cast shadows onto the kitchen worksurfaces. This homeowner installed a row of recessed lights around the perimeter of the kitchen to provide better light on the countertop prep surfaces. In the dining area, a softer chandelier on a separate switch lights the table, which gives it a more comfortable, relaxing feel for when it’s time to eat.

Cost

4” lights are going to cost you less upfront simply because they’re smaller and cost less to make – although prices are going to vary based on materials, finishes, and special features. They also cost less to run because they use less power. 

6” lights may cost more, but (depending on the specific fixture) you may be able to use fewer 6” lights to achieve the same coverage as a larger number of 4” lights. 

If you’re on a tight budget, you’ll want to map out your room with both sizes and then run the numbers both ways to make sure you’re getting the best deal. 

Decor

For years now, homeowners have been ditching ceiling lights in favor of a grid of recessed lights. But, the lack of visual interest is starting to sway designers back towards beautiful statement ceiling light fixtures like chandeliers and pendants. 

In rooms where modern statement fixtures are providing most of the ambient light for space, larger recessed lights aren’t really necessary. 4” lights are a much better option for creating beautiful layers of light without over-lighting your space. You’ll find this size most often in rooms with a modern design.

You’ll find 6” lights most often in large open rooms that need a lot of light, and in rooms with more traditional decor. 

Because 6” lights are more common, they currently have more trim styles available. If you have a specific style of trim in mind, make sure you find out if it’s available in the size you want before you buy!

Location/Uses

4” recessed lights are most commonly used in smaller spaces like hallways, home offices, and over the kitchen sink. They’re perfect for lighting a reading or craft area where you want to see what you’re doing. They’re also a great size for highlighting artwork or architectural features without washing them out. 

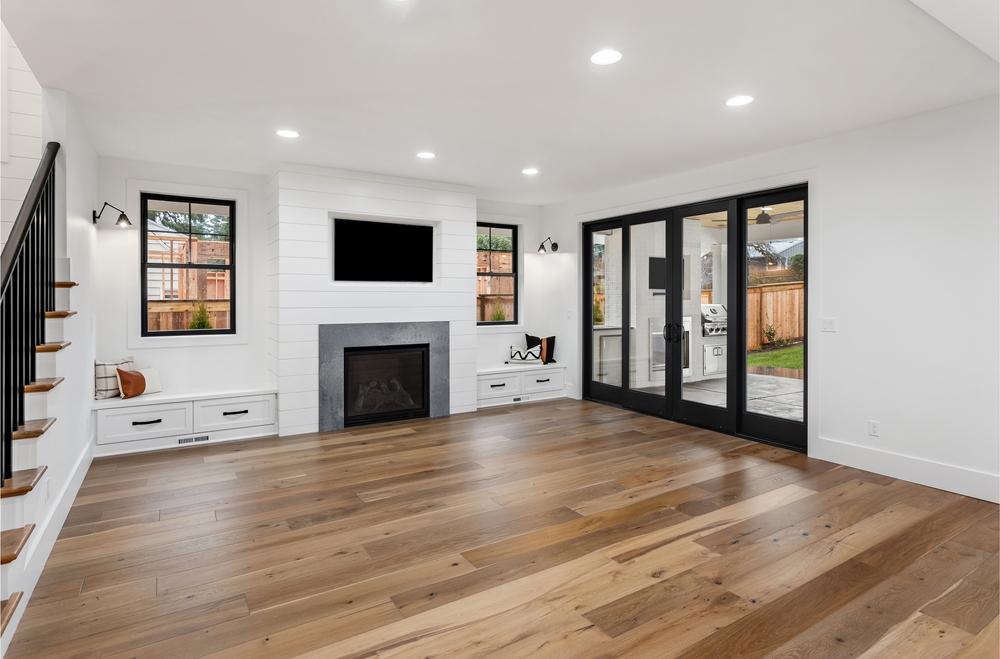
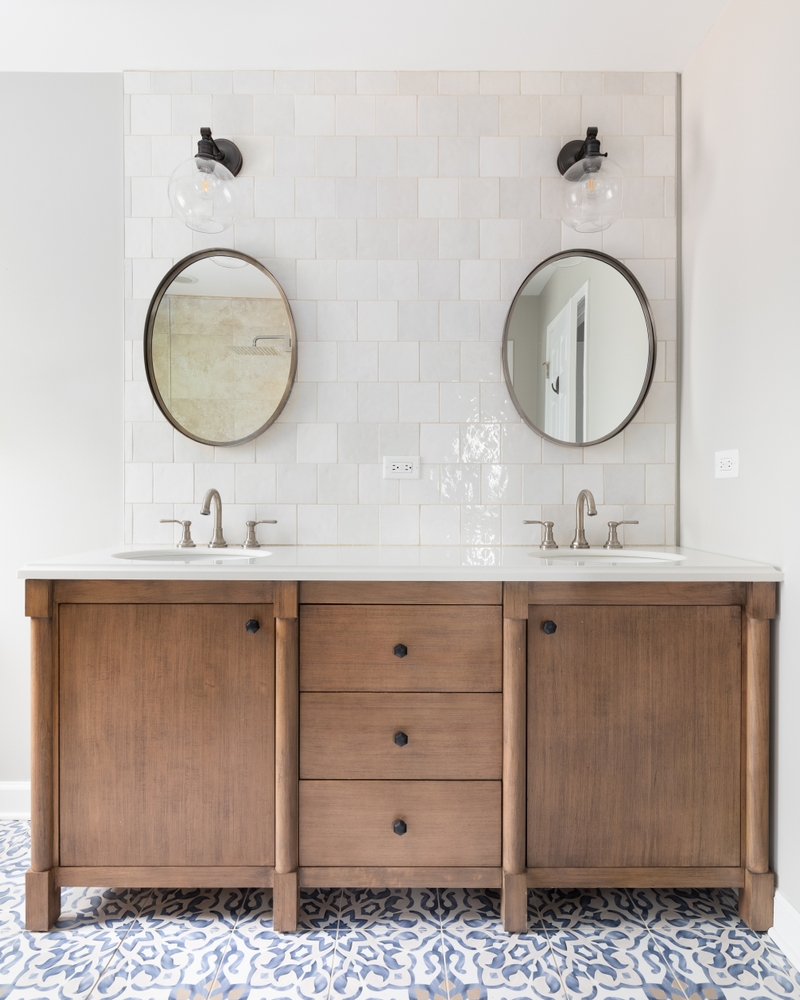
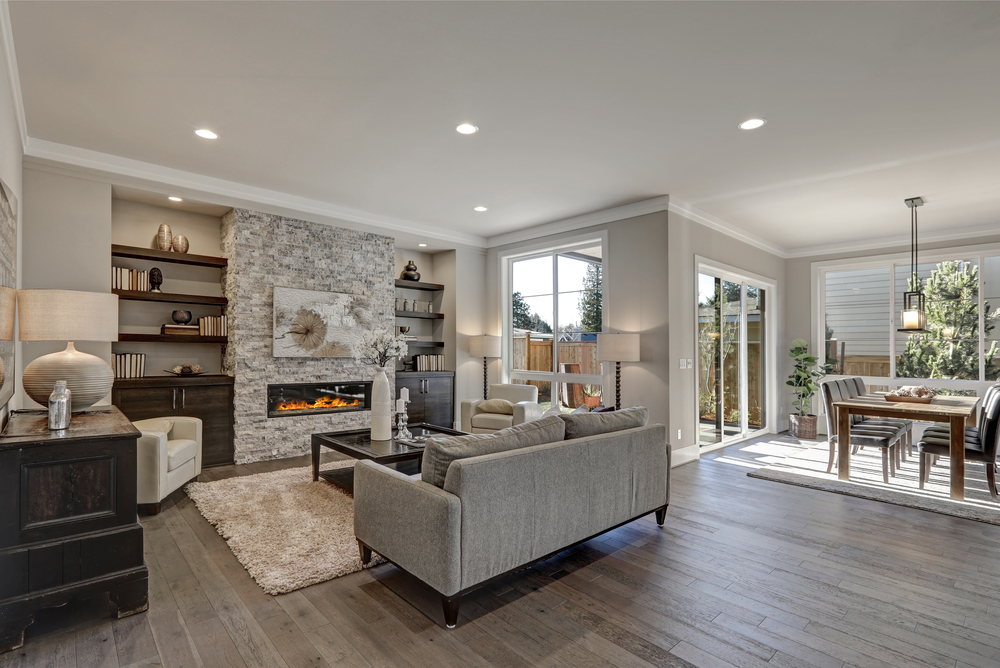
6” lights do their best work lighting a large room like a living room or dining room. They’re also a great choice for rooms with high ceilings, as their larger size will help to spread the light more uniformly throughout the space.

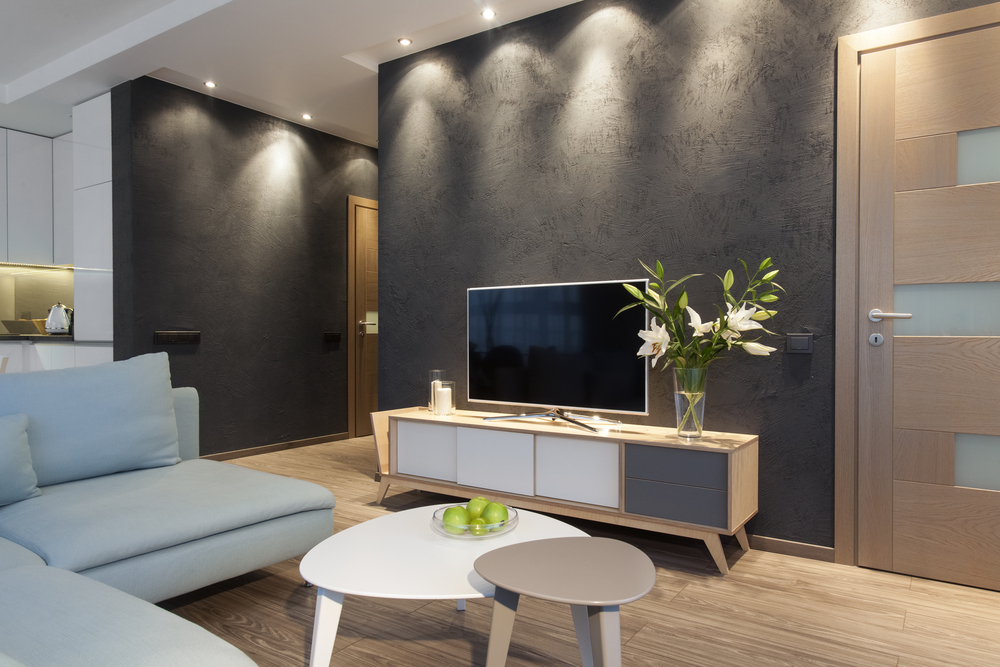
Properly placed recessed lights can make your rooms feel bigger if you employ a technique called Wall Washing. Wrapping your room in 4” recessed lights will evenly coat the wall with light, making the entire space feel more spacious. This is a great trick for smaller spaces like hallways and narrow rooms, and it helps to hide imperfections in the wall finish. 

Placement is important here – if your recessed lights are installed too close to the wall, they’ll create a cone of light (called wall grazing) which will not have the same space-creating effect. The goal is to get soft, even coverage across the wall without any harsh lines.
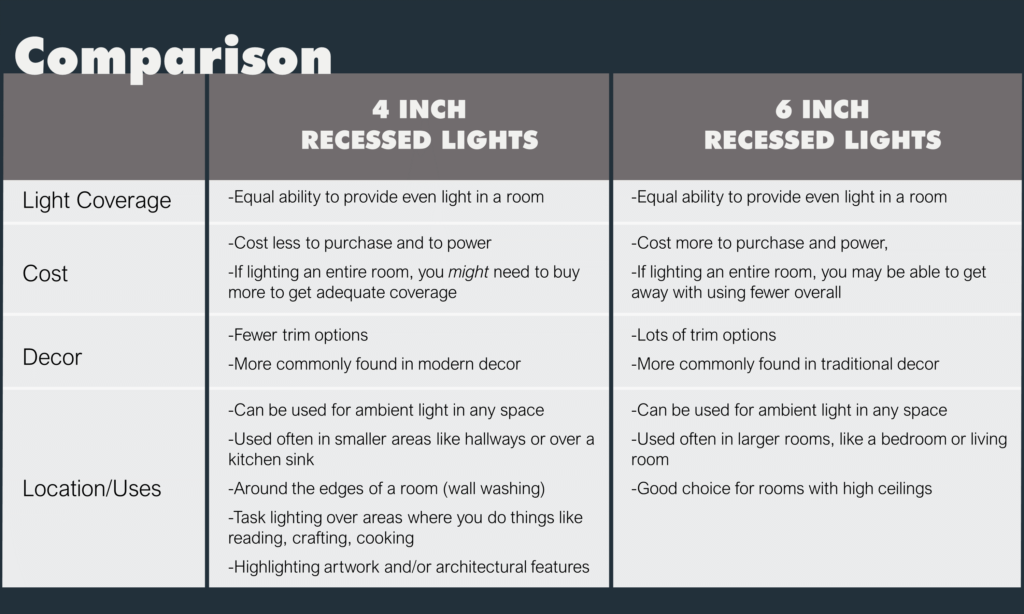
Overview

To sum it all up, here’s a handy comparison between 4” and 6” recessed lights. 

Other Things to Consider

The size you choose matters, but there are other things you need to consider before purchasing! LED recessed lighting has come a long way in the past few years, and new features are regularly being added to the lineup.

Color

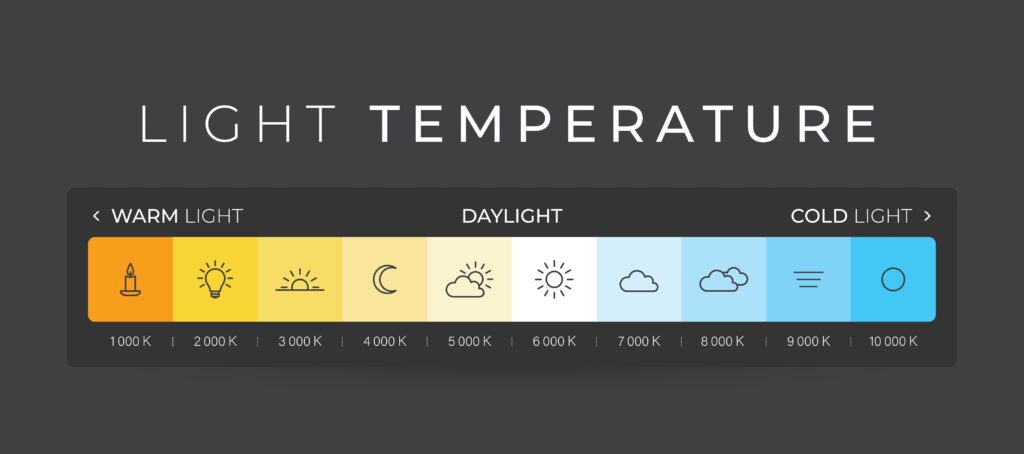
LED lights come in a wide variety of colors, measured in Kelvins (K). 

Warm light (up to 3000K) appears orange or yellow, like the light from traditional incandescent bulbs. It feels soft and cozy, and is a great choice for places where you want to wind down and relax, like a bedroom or a living room. 

Daylight light (between 3000K – 4000K) is similar to the light at midday. It feels bright and white, and is a great choice for most rooms in the house. 

Cool light (above 4000K) starts to appear blue as the Kelvins increase. Blue light feels crisp and energetic and is often used in offices and hospitals to help keep people alert. Be careful with blue light in your home – it can keep you up at night! 

The color you choose for your lights will change how the paint on your walls looks, so it’s a good idea to experiment with it first before you commit. 

Color Changing lights – Some LED lights are color-changing, meaning they can be set to emit warm or cool light, which takes the stress out of worrying which temperature to choose. Some lights can be changed with a switch in the housing, which is great for homeowners that want to choose what they like, set it, and forget about it. Others can be changed with a remote control or a smart hub, making the lighting in your house truly customizable to any activity.

Dimmable

We recommend installing LED lights on a dimmer switch whenever possible! Because they are so bright, it’s nice to be able to dim the lights to a level that you’re comfortable with throughout the day. Most LED lights are already dimmable, but some aren’t, so you’ll need to double-check before purchasing if this is a feature you want in your home!
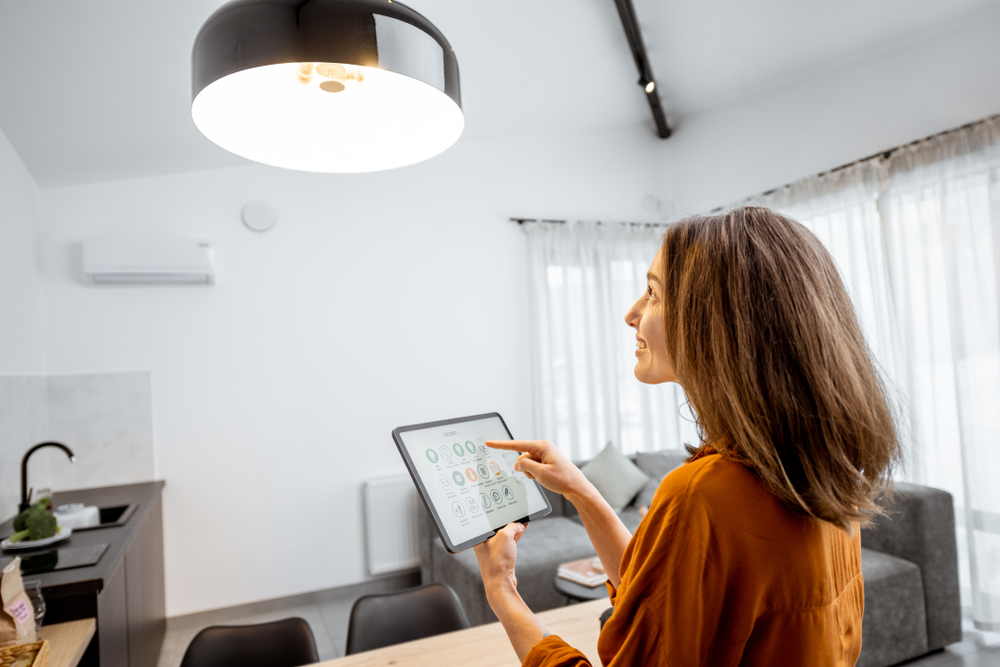
Smart Technology

Smart LED recessed lights come with the ability to communicate with other technologies in your home, like a smart hub. Depending on the features, this means you could set your lights on a schedule or even turn them on with a voice command instead of a switch. 

There are a lot of things to consider when you’re installing recessed lights. Our lighting experts know all of the ins and outs and would love to share their knowledge with you to help get you started. Give us a call or stop by our showroom and see for yourself how recessed lighting can completely transform your home.

Filed Under: 2022, How to, Informational, Recessed Lighting

9 Surprising Ways to Glow Up Your Home Exterior (Literally)

9 Surprising Ways to Glow Up Your Home Exterior (Literally)

by admin · Nov 15, 2023

Most neighborhoods look the same when you drive at night. Because no matter what makes homes unique during the day, they almost all only use a porch light or two at night. But your home doesn’t have to lose its character and statement features just because the sun went down!

You may be surprised that there are at least nine ways to light your home’s exterior. We’ll dive into expert tips to unlock the unexpected for your evening curb appeal and outdoor activities. From increasing safety to creating drama to inspiring luxury, mix and match these lighting methods to customize an unforgettable “evening look.”

1. Accent Lighting

Accent lighting uses light to draw attention to a feature of your home or garden. In fact, any of the following eight lighting techniques can be used as accent lighting! For example, try using a spotlight to show off a flagpole, up-lighting on a few trees to increase their impact, or silhouette shrubbery for subtle mystery.

A tip from the experts: Trying to figure out what to accent on your home exterior? Make a list of your favorite things about your front yard (or what you’d like to add to your yard).

2. Down-lighting

Want to increase visibility for outdoor activities? Try down-lighting! This lighting technique positions the light source up high with a shade that concentrates the light towards the ground. The bright light makes evening play safer and keeps the party going after sundown.

A tip from the experts: Trees are a great place to nestle down-lighting sources with finesse.

3. Highlighting

You’ve likely seen yards in a fancy neighborhood that look like their trees are glowing somehow. They’re probably being highlighted! By shining a spotlight or two from the base of a tree or other feature, the light will reflect only off the object. This concentrated glow makes the object look like it is lit from the inside!

A tip from the experts: Highlight is a simple way to immediately make your home look upscale and luxurious.

4. Moonlighting

Are you looking for more magic and romance in your outdoor space? Then try out moonlighting! Like down-lighting, moonlighting uses a high-up light source to concentrate light downwards. However, this method uses more subtle sources and dimmer light– mimicking the softness and mystery of a full moon!

A tip from the experts: Moonlighting is most effective in backyards and wooded areas, where the soft light can trickle down through the leaves.

5. Silhouetting

Silhouetting is the opposite of highlighting, but its effect is equally dramatic. Instead of lighting the feature itself, you can use the light source behind a tree and the wall. This will shine the light on the wall and cast the tree or other features into shadow. So you’ll get the soft shape of your feature, giving impact in a subtle way.

A tip from the experts: Make sure to angle the light towards the wall to create the greatest effect!

6. Shadowing

Want to spread the beautiful pattern of your tree leaves against your home? Then shadowing is the perfect technique for you! Shadowing combines highlighting with silhouetting for a completely new effect.

Like silhouetting, you’ll position your light source towards a wall behind the tree. But, like highlighting, you’ll put the light in front of your tree. As a result, you’ll cast a dramatic shadow of your tree against your home while clearly illuminating the trunk.

A tip from the experts: This works best with tall, leafy trees for an enchanting summer evening. The bare branches will look stunning in the winter too!

7. Path-lighting

Upgrade the magic and safety of your front walk or garden path with path-lighting! Solar lights are easy to install and come in endless designs and colors. Not only will path lights make your home safer, but you’ll get to enjoy your plants and landscaping around the clock.

A tip from the experts: Space your path lights 5 to 10 feet apart, depending on the lamp’s brightness.

8. Up-lighting

Want to add drama with a contoured view of your home? Up-lighting uses spotlights to throw light upwards on your home exterior. You’ll work with the natural layers of your home to create interest and luxury. Even in a cookie-cutter development neighborhood, your home will stand apart!

A tip from the experts:  Try staggering these lights along the ground level and roofline to maximize the impact of your home’s features.

9. Wall-washing

Our final lighting tip brings us to wall-washing. This method uses focused ambient lighting to cast even light across an entire wall. Instead of the dramatic shadowing created by up-lighting, you’ll get a clear picture of the garden or home wall without harsh light.

A tip from the experts: The key to great wall-washing is placing the light source at a wide enough angle. Hide the source in low foliage for added mystery.

Need Help?

Proper lighting is essential to a fully functioning home– but it can be challenging to nail balanced brightness, great fixtures, and a budget! Contact the experts at Western Chandelier for advice on your project!

Filed Under: 2023, Outdoor Lights, Styles & Trends

5 Tips to Create the Dreamiest Porch

5 Tips to Create the Dreamiest Porch

by admin · Nov 8, 2023

The front porch is an often overlooked space which is, in our humble opinion, a shame. A cozy front porch is a perfect refuge from any inside chaos. It’s the first thing a guest sees and a private place for an intimate conversation with a close friend or family. Here are some tips to help you create the front porch you’ve been dreaming about:

  1. When in Doubt, Add Plants
  2. Let Your Door Speak For Itself
  3. Lighting, Lighting Lighting 
  4. Less is More!
  5. Pick Comfortable Seating

1. When in Doubt, Add Plants

One of the simplest ways to level up your porch is to add some plants and flowers. Choose real plants if you have the time and motivation you to keep them alive or, if your thumb is less-than-green, just stick with faux. Either way, a little bit of green adds a lot of life and color to a house!

Throw a couple of potted ferns like these on either side of your door to add a touch of green without going overboard. Simple, but effective.

Look, we know not every house is blessed with beautiful draping greenery like this one, but who could resist this Secret-Garden-like oasis? If you’ve got a green thumb, this front porch is one to aspire to.

Flowers

If you want to turn the head of any passerby, flowers are the way to go. They add a pop of color and are a guaranteed way to brighten everyone’s day!

Potted flowers are a good solution if you have a minimal front yard or no flower beds. This porch’s flowers are to die for, but you don’t have to have this many for a stunning result! Even tossing a couple of pots next to your door can add vibrance and life.

Hanging flower baskets are a classic way to add some dimension to a porch. Choosing to hang flowers instead of having them on the ground can also save space so you won’t have to sacrifice the porch set you’ve had your eye on.

2. Let Your Door Speak for Itself

You can do a lot to dress up a front porch, but if the door is lackluster, you’ll be hard-pressed to make the rest of the porch shine. Whether you paint your door, replace the hardware, or replace the whole door with something more your style, don’t forget to give it some TLC!

Whoever picked the color on this door should be given an award! This minty green pops against the red brick, and the gold hardware ties the whole look together.

A simple wooden door can bring warmth to a neutral-painted house like this one. We love how the sconces match the hardware on the door of this home to create a cohesive look. Even the smallest detail is accounted for and we’re impressed! 

3. Lighting, Lighting, Lighting

Lighting is a simple way to take your porch to the next level. There are tons of options to choose from, but two of the most common (and effective) front porch fixtures are sconces and pendants. If you have a larger porch, you should also look into recessed lighting to give you more light.

Sconces

A sconce is a wall-mounted light fixture that’s often used next to or above the front door. Picking the right ones for your house makes a big impact on your porch’s aesthetic and style. Check out how well these homeowners did!

These sconces have a rustic feel that contrasts beautifully with the white siding. They give this home just a spritz of farmhouse!

This sconce has a little more flair but is still a classic style you won’t need to replace when trends change. We also giving this porch bonus points for the fan above the rocking chairs! There’s nothing better – or more refreshing – than a cool breeze in the summertime.

This porch’s clean lines flawlessly match the sconces, giving the whole look a modern edge we love!

Pendants

A pendant is a light fixture with a cord or chain and usually just one light attached. They’re commonly used above a door in an entryway with a higher ceiling. Pendants are practical, but they also make a gorgeous focal point. Here are a few to inspire your next porch project!

The warm stone flooring on this porch needs some contrast to make it feel up to date. The black-finished pendant combined with the matching black door complete the whole ensemble.

This porch is timeless. A warm door combined with a simple, but elegant pendant is a classic combination to make any house feel inviting.

Pendants are incredibly versatile and work well in a number of locations – not just above the doorway. They’re also a great choice above porch furniture to create a comfy space for a leisurely chat with a friend.

4. Less is More!

Redoing your front porch can feel overwhelming, but it doesn’t have to be. These simple porches prove that less really can be more with some expert advice!

There’s nothing prettier than a warm wood door and black shutters, especially on clean white siding. This porch has. it. all. Symmetrical greenery, gorgeous sconces, some simple furniture, and a fan are truly all you need to have a beautiful and functional porch.

If you have a small porch, using some hanging elements (pendants, flowers, etc.) will add dimension and will give you space for some furniture without sacrificing a beautiful result.

We love the creativity of this small porch! Since there’s no room for plants next to the door, this homeowner added greenery on the sconces. The arched window above the door is the prettiest focal point to bring together an elegant, but minimal look.

This porch looks bigger because of the reflection of the windows on the door. The rest of the space is also well-used. From the small plants placed on stands to make them look taller to the hanging pendant, every inch is accounted for!

5. Pick Comfortable Seating

There’s something nostalgic about sitting on the porch on a summer night – like an ode to the simpler times of days gone by. Picking comfortable seating will make you want to sit on your porch, reflecting and enjoying the simplicity of the moment.

Porch Swings

There’s nothing more soothing than the back-and-forth motion of a porch swing!

The cozy cushions and pillows on this swing make it the ideal spot to snuggle up with a blanket for an autumn nap or to curl up with a book.

This swing lends itself perfectly to a conversation with a friendly neighbor, family member, or friend.

Rocking Chairs

Make the most of warm spring and summer days by relaxing on a rocking chairs with an ice cold lemonade sitting on a table beside you!

Rocking chairs are a comfortable seating option, but they take up less space and aren’t quite as permanent as a swing. The pillows on these pretty white rockers tie in the shutters on the house and are the perfect spot to enjoy a bit of nature.

Rocking chairs are simple and inviting whether they’re styled or not. We love the idea of watching the neighborhood kids ride their bikes, watching the dogs be walked, and seeing the world slow around you as the sun sets from the comfort of your rocking chair.


Don’t let your front porch fall by the wayside any longer! When you’re ready to get to work creating the porch of your dreams, give Western Chandelier a call. We’ll give you all the tips you need to make your dreams a reality.

Filed Under: 2023, Outdoor Lights, Styles & Trends

9 Ways to Upgrade Your Home with LEDs

9 Ways to Upgrade Your Home with LEDs

by admin · Nov 1, 2023

With their excellent energy efficiency, affordable price tags, and numerous customized options, LED light bulbs are quickly becoming the top choice for home lighting. Available in small bulbs and flexible strips, these microchip-powered wonders fill almost every need in your home– including some you didn’t even know you had!

So get ready to upgrade your home’s functionality and style! Here are nine ways using LED bulbs in your home can improve your home’s design, costs, comfort, and safety.  

1. Energy Efficient

LEDs are highly energy-efficient light sources because they create light with a microchip. With no gas or burning filament, they waste far less energy in heat production (not to mention much better customization in color, brightness, and temperature. But we’ll get to that later!) 

Unlike older bulbs, LED bulb packaging uses lumens instead of watts to tell you how bright they are. Watts measured the electricity needed for incandescent bulbs to glow, but lumens directly measure the amount of light a bulb gives off. The higher the lumens, the brighter the bulb.

But it’s not just the packaging that’s changed– your utility bill will decrease when you replace incandescent bulbs with LEDs. They use far less energy than incandescent bulbs to give off the same level of light, savings you’ll actually be able to see. 

2. Work with Most Light Fixtures

No matter your light fixture, there’s likely an LED bulb that’s a perfect match. LEDs come in a wide variety of standard-sized bulb sizes and shapes– so you can even use them in your candelabra chandelier! 

The only thing to watch out for is ventilation. LEDs are cool bulbs compared to incandescent and other traditional options, but they’re not entirely immune to overheating. So if you’re ever in doubt, give a local lighting expert a call and they’ll help you find the correct bulb.

3. Safer than Other Bulbs

LED bulbs are one of the safest ways to light your home– they produce minimal heat and use very little energy. They’re even safer than fluorescent bulbs, a top competitor for energy-saving lighting. Compact fluorescent bulbs, or CFLs, glow by passing an electrical current through mercury gas. So CFLs are a little risky in “accident-prone homes,” like homes with pets or small children.

On the other hand, LEDs glow using a microchip. In fact, LEDs don’t even need to use the glass bulb case– they’d be just as safe and contained without it! So if you want to increase your home safety while still being energy efficient, swap out your CFLs for LEDs.

4. Best Color Rendering Index (CRI)

Did you know that the way you see color depends heavily on the type of light shining on it? Stores and online product photos use great lighting to show their products at their best potential. But if you bring those products home in poor lighting, you may be surprised to find that it doesn’t look as great as they did before. It’s not always buyer’s remorse, though– sometimes it’s just bad lighting!

LEDs are one of the best on the color rendering index (CRI), meaning they show colors more accurately. Their light will be very close to the lighting in-store or in the product images, so it’s much more likely to look the same in your home as it did in the cart.

As a bonus, high CRI lighting is a huge help in places like your bathroom or closet. Accurate lighting can help you pick the right clothes and do your best makeup. No more surprises when you see yourself in the office mirror!

5. Dimmable

Dimmable bulbs are perfect for rooms with multiple functions. Take your living room, for example– during the day, you’ll want bright light as you move about your daily activities and tasks. But in the evening, you want your living room to be a soft, cozy space where you can relax and unwind. 

LEDs can come with dimmable capabilities, making them perfect solutions for bathrooms and bedrooms. They will also work with your existing dimmer switches and remotes. So simply swap out your old bulb, and you’re ready for a day-to-night lighting experience!

6. Vary in Temperature

A bulb’s light temperature refers to whether the light falls into cool (blue) or warm (red) light. Cool, blue light is in the same range as direct sunlight– it wakes you up and gets you focused. Warm light is similar to fire and candlelight and helps you to relax. Traditional bulbs were all warm light, but modern LEDs come in a wide variety of light temperatures.

How will knowing this improve your home, you ask? Our bodies work with a circadian rhythm– the natural cues to wake up with the sunrise and relax at sunset. But our modern life surrounds us with blue light well after sunset, eliminating the natural transition to red light before sleep. Choosing the right LED bulbs makes it easy to reintroduce the red light phase to your circadian rhythm. 

Opt for warm light bulbs in places where you relax at the end of the day (dining room, living room, bedroom, etc.), and it’ll help signal to your brain that it’s time to go to bed– making it easier to fall asleep at bedtime. Just don’t undo your brain’s relaxation by staring at your phone screen in bed afterward!

7. Smart Integrations

What’s a smart home without smart lighting? LED bulbs are a top smart home choice because they offer a wide range of stress-free customization.

This flexibility makes them a great choice to use on their own, but they’re also great options to use with your smart home setup. Set routines for lights to turn on and off and control settings from your phone on the go!

You can even create a habit with your smart home assistant to ”warm up” the temperature of your LEDs a few hours before bed. It’s a simple change that could significantly help your family rest better– and avoid the increased risk of depression, anxiety, and weight gain connected to regular poor sleep.

Remember, not every LED bulb is “smart,” so make sure you read the packaging to get the perfect addition to your smart setup!

8. Customize Color

LED stands for “light emitting diode”– big words to describe a glow from passing electricity through a microchip. Because of the way they work, many LED bulbs can change color, temperature, and brightness with the press of a button.

Color customization may seem like a party trick with little functional use. And while they are a great novelty at parties, color-changing lights can also help you wind down at night and reduce eye strain when watching TV or sitting in front of a computer monitor.

LEDs are excellent for creating bias lighting for your TV or computer. Bias lighting casts light on the wall surrounding your screen to help decrease the intensity of the image, making it easier on your eyes. It also increases the contrast of your screen, so you’ll get a better view without upgrading your tech!

9. Strip Lighting

A lesser-known use for LED lights in the home is strip lights. If you’re looking to make your home look and feel like a bespoke model home, these are the way to go. The best part– they’re inexpensive and simple to install. 

LED strip lights can be wired to a switch, but homeowners often opt for battery-powered or plug-in options for noninvasive installation. They typically come with either a remote or smart home integration capabilities. They’re also tiny, and since many come in a user-friendly peel-and-stick variety, they’ll fit just about anywhere! 

We recommend trying out LED strip lights in places like:

  • Kitchen Cabinets: Stash these inconspicuously under cabinets to make dinner prep easier and safer, or add them inside glass-fronted cabinets to turn your dishes into art! You can also place them under the toe-kick to light those late-night snack runs.
  • Stairways: Make your evening bathroom trip safer by lining your stairs with light. Don’t want to see them? Try tucking them underneath the handrail!
  • Closets and Shelves: Want to turn your dark closet into an elegant dressing room? LED strip lighting will elevate your closet without any structural changes. Add them to the top of shelves, above your shoes, or around the top edges of your walls – they’ll go anywhere you need more light.
  • Bedroom Mood Lighting: String a few LEDs around your walls and change the color  or brightness of your entire room without lifting a paintbrush– a very popular DIY for teenagers and social media creators
  • Bathroom GlowUp: Stash a few LEDs under bathroom cabinets for a toe-kick touch of luxury and soft lighting. Or use around your mirrors for true lighting during your daily skincare routine!

The Possibilities are Endless

LED bulbs and strips are small, easy to install, and can fit just about anywhere. Whether you’re swapping out all of your home’s bulbs or just adding custom lighting to your favorite spaces, LEDs can give you that luxury feel without breaking the bank. And when you factor in their energy efficiency, customization applications, health benefits, and smart home applications, it’s easy to see why LED bulbs are the swiss army knife for home lighting needs.

Proper lighting is essential to a fully functioning home– but it can be challenging to nail the balance between light levels, fixture designs, and a budget! For your next project, contact the experts at Western Chandelier.

Filed Under: 2023, LED, LED Lights, Styles & Trends

3 Ways to Layer Light and Level Up Your Interior Design

3 Ways to Layer Light and Level Up Your Interior Design

by admin · Oct 25, 2023

Have you ever been to a friend’s house whose home has that X factor? Something that made it seem really inviting even if their decor wasn’t notably upscale? That friend probably had great lighting.

Color, shape, and texture are the building blocks of interior design–but lighting dictates how everything comes together. So, what goes into a well-lit room? Design experts recommend having 5-7 different light sources in any space. These “layers” of light make it so that you can customize the mood, function, and comfort level of a room depending on how you’re using it.

There are three basic layers of lighting to consider: ambient, accent, and task lighting.

Read on to see how these layers of light work– we’ll show you exactly how things like location, bulb choice, and design combine to give you the perfect lightscape. Then the ball’s in your court! Working layer by layer, and with just a little bit of insider lighting know-how, it’s easy to give your home that X factor too– without having to replace a single decorative pillow.

Layer One: Ambient Lighting

The most basic level of lighting for any room is ambient lighting. Ambient lighting is the light that fills the room, casting an even glow from overhead. In most homes, this will come from a central flush mount (often the dreaded “boob” light), a ceiling fan and light combo, or can recessed lights.

Let’s dive into top considerations to creating great ambient lighting.

Location

If you are using one large light as your ambient light source, keep it central with maximum light flow. It’s usually a good idea to use a glass covering instead of metal or wicker shades to avoid creating shadows.

If you want to create ambient light with a grid of recessed lights instead, spacing is critical. An easy trick to determine how far apart your recessed lights should be is to divide the height of the ceiling by 2. For example: For 8-foot ceilings, divide 8 by 2 (8÷2=4) – consider staggering your can lights about 4 feet apart for optimal lighting.

Pro Tip: This formula will get you started, but there’s a lot to consider if you’re installing a new grid of recessed lights in your home. The size and trim can vary greatly, which will have a big impact on light coverage– and you need to take the shape and layout of your room into account. If you want help getting your recessed lights spaced correctly, stop by our showroom and check in with one of our lighting specialists!

Bulb Choice

Each room of your home will have different bulb requirements. For your kitchen, bathroom, and office, lean into brighter, cool light. These bulbs will activate your brain for better concentration and focus. Look for bulbs that say “bright white” or “daylight” on the packaging.


On the other hand, bedrooms and living rooms are usually dimmer and warmer to encourage relaxation. These bulbs will say things like “soft white” or “warm white” on their box.

Design Tips

While there’s not necessarily a one-size-fits-all solution, great ambient lighting will completely transform the way your room feels. Here are a few tips that will translate across most rooms and decor styles:

  1. Consider replacing the standard “boob” lights. While they’re great at lighting a space, the shape of these lights can sometimes feel boring or dated. Don’t be afraid to get creative– there are so many other options available!
  2. Play with paint colors: the color and tone of your walls have a big impact on how the ambient light reflects. Check your paint samples at different times of the day to see how they look with both daylight and your light fixtures. 
  3. Think about going bigger! If a flush-mount fixture feels underwhelming, take a look at other options like ceiling fans or pendant lights. Chandeliers are also making a comeback– they’re not just for vintage vibes! You can play up crystal delicacy for a soft touch in a modern room or branch out with wood beads or other designs.

Pro tip: If you’re planning on replacing your ceiling fixture yourself, make sure your new light is properly supported. You might need to install a sturdier electrical box to support the extra weight of a larger fixture– just check the installation guide before you get started!

Layer Two: Task Lighting

The next layer of your lightscape is task lighting. Task lighting shines extra light on a space to make doing a specific task easier and/or safer. It’s especially helpful for tasks that involve working with small objects, like sewing, or that require concentration, like reading.

Location

You need task lighting anywhere you are performing detailed work. Your home likely already has some task lights installed in common places, such as a bright wall sconce over the bathroom mirror where you get ready, and pendants or recessed lights above a kitchen counter. 

Lamps are the real MVP of task lighting, because they can go anywhere you can run a cord. You’ll find them sitting on a desk, in the garage over a workbench, illuminating the music on a piano, next to a cozy reading nook, on the bedside table, and more. 

Bulb Choice

Task lighting usually uses bright white light to get the best view and activate the attention centers of your brain. There are a few exceptions, however. If you’re lighting a reading nook or a bedroom you’ll want softer and/or warmer light to get that cozy comfort.

Design Tips

Even though task lighting is “task-oriented,” it doesn’t need to be 100% utilitarian. Here are a few ways to think about making your task lighting both beautiful and functional:

  1. When possible, work with odd numbers of light– it will feel more organic. For example, 3 or 5 pendant lights will look usually better over a kitchen counter than 4. 
  2. Experiment with different materials for lampshades. A glass shade will maximize the glow, woven shades will give a light filtering effect that softens the light, and opaque shades will concentrate the light. You can completely transform the way a lamp or pendant lights your space with a simple shade swap! 
  3. Don’t forget your bathroom vanity! Most vanities have a light above the mirror– but that’s not necessarily the best placement for getting ready. Face-level light on either side of your mirror is best for doing things like applying makeup.

Pro tip: Did you know that LED light is widely considered the best lighting for applying makeup? It’s the closest to natural daylight! Try a backlit mirror or LED strips at facelevel to see your makeup’s true colors.

Layer Three: Accent Lighting

Accent lighting is the fun layer– it leans much more into design than function. The purpose of accent lighting is to create a mood, or to highlight a specific feature in a room like an architectural detail or a piece of art. 

Location

Unlike ambient or task lighting, accent lighting doesn’t have a simple rule for best placement. Whether it’s hanging from the ceiling, sitting on a shelf, or standing on the floor, accent lighting can come from anywhere and shine on anything. 

One way to determine where you need accent lighting is by thinking about your favorite evening activities. For example, where do you and your family cuddle for movie night or bedtime stories? Turn off your ambient lighting and see where you need a lamp, some sconces, or LED strips.

Pro tip: Plan on having 2-3 sources of accent light per room.

Bulb Choice

Accent lighting that’s highlighting a feature is typically small and bright. For accent lighting that’s creating a mood, look for dimmable options. Either way, you’ll need warm bulbs to achieve a cozy glow! Look for bulbs that say “soft white” for the gentlest light, with “warm white” as a close second. 

Accent lighting opens the door for you to get creative! Check out some color-changing smart bulbs or LED strips that can really change the way your room feels with just the touch of a button!

Design Tips

Accent lighting is very specific to a person and their space, so there aren’t any hard-and-fast rules. Here are a few ideas to get your imagination flowing:

  1. Fill in the blank: if you’re missing a color or texture in your room, try bringing it in with an accent lamp. Warm up a modern space with a wooden or stone lamp, or balance your color palette with a new lampshade. 
  2. Choose the unexpected: use sconces and pendants where you’d normally place a lamp. For example, if you have a couch tucked into a corner that could use more light, save floor space by hanging a pendant above the seat.
  3. Track lighting isn’t just about the lights– it can elevate your room by highlighting other decor and collections! Try placing them above your gallery wall to elevate your wall to an art museum experience. 

Pro tip: Renting or want to avoid hiring an electrician? You can still use pendants and sconces! There are special varieties that use a plug– no hardwiring required. 

Ready to Customize Your Lightscape?

Now that you have the guiding principles ready, the possibilities are endless! If you’re ready to get serious about your home’s lighting and design, the experts at Western Chandelier can help you connect to a showroom near you. Contact us today!

Filed Under: 2023, Styles & Trends

3 Things You Need to Know About Recessed Lighting

3 Things You Need to Know About Recessed Lighting

by admin · Oct 18, 2023

Recessed lights can radically change the way your home looks and feels. Done right, they can bathe your space in soft light, highlight special features, and help you set the right mood. Done wrong, they turn your ceiling into a polka-dotted nightmare of harsh spotlights and awkward shadows. So, how do you get it right? 

We’ve put together three of our top expert recessed lighting tips based on our years of experience in the lighting industry to help you get it just right! 

Installation Know-How

If you’re building or remodeling, now’s the best time to be thinking about recessed lights. Recessed lights are easiest to install during construction. With the walls opened up, it’s not a big deal for an electrician to run the necessary wires and mount the lights. 

If your home is already finished and you’re really not ready to tear out the ceiling, don’t despair! The recessed lighting industry makes a whole line of specialty lights designed for non-intrusive updates. Look for lights that say retro-fit in the product description – this means they can be more easily installed in an existing ceiling. Canless recessed lights are ultra-thin (the same thickness as your ceiling’s drywall), which makes installing them the most DIY-friendly option for homeowners.

Placement is Paramount

One of the most common mistakes homeowners make when installing recessed lights is poor placement. Your recessed lights should wash your walls, not just the floor, with light. If your walls aren’t properly lit, your room will feel dim and dull no matter how your lights are installed. 


Wall washing spreads soft light evenly across a wall, and it will make your room feel bigger and more open. For example: the recessed lights in the image below (see upper left) cast soft light across the entire wall, which makes the room feel larger and brighter.

A close cousin, wall grazing (as seen below), occurs when recessed lights are placed close to the wall and the cone of light casts harsh lines of light and shadow. This is typically done to accent a design feature, not to provide ambient lighting for a room.

Wall washing is usually the goal in residential applications – it’s a good idea to talk to a lighting expert before you get ready to install to make sure you get them at the right distance from the wall.

A grid of soft white lights will give off a comfortable, all-over light, which is perfect for large rooms, but it’s not one-size-fits-all for every space in your home. Areas where you work, like your kitchen, should have more focused task lighting over countertops and work surfaces. 

Quick Tip: Space recessed lights away from ceiling fan blades or you’ll end up with a subtle strobing effect when both are on. Also, avoid placing bright lights directly over a seating area so that your guests won’t feel like they’re under a spotlight.


Zones and Dimmer Switches

Your lighting plan will be most effective if you can create zones based on how you use your space. Large spaces and multi-purpose rooms have different lighting needs throughout the space. If you strategically wire these areas independently, they can work together to give you more control over the way your room works for you. 

For example, a living room may have a row of wall-washing lights around the perimeter, a central grid of ambient lights, and a couple of spotlight lights to highlight a feature fireplace or some artwork. If each of these zones can be adjusted independently, you can transition a bright morning workspace to a cozy evening entertaining space with ease. 

Wherever possible, install each zone with a dimmer switch. Being able to adjust the intensity of light in your space is an essential part of creating the right mood. An added benefit of dimmable lights is that they last longer when not used at full power, so you can extend the life of your bulbs and entertain houseguests at the same time!

Installing recessed lighting is no small task, but it doesn’t have to be a big pain in the neck. Whether you’re a D.I.Y.er needing a few pointers, or if M.O.D.I.F.Y. is more your speed (Make Others Do It For You), we can help you find exactly what you need to get it done. Give us a call or stop by our showroom today!


Filed Under: 2022, Recessed Lighting

12 Simple Bathroom Updates You Can Do Yourself

12 Simple Bathroom Updates You Can Do Yourself

by admin · Oct 11, 2023

Bathrooms are spaces that often go overlooked, but when they’re spruced up, they add some serious value to your home! Remodeling can take loads of time and effort (not to mention money), but giving your bathroom a facelift doesn’t have to. These simple tips can give you the bathroom of your dreams.

1. Organize

The last thing you want to deal with at the beginning and end of your day is CLUTTER. Give yourself the gift of a good system! Containers may seem unnecessary, but when you’re rushing out the door, it saves you a headache to just have an easy home for all your toiletries.

2. Add Greenery

Plants bring life, peace, and tranquility into a space. This bathroom would be the perfect escape from the stress of everyday life. The warm tones mixed with the green tell you to relax and take a break. Who are you to tell them no?

3. Change the Hardware

Arguably one of the easiest ways to take your bathroom from the early 2000s to today without spending a fortune is changing the hardware on your cabinets. Finish options are endless! The bathroom above uses gold accents to create a cohesive look with a modern feel.

4. Spruce Up the Walls

If you’re looking for a simple way to make a big impact in your bathroom and have a free weekend coming up, a fresh coat of paint and some elbow grease will make your bathroom feel like a brand new space with just a few hours of work! 

Want to take it to the next level? Bold wallpapers are in, and they really let you show off your personality! This bathroom incorporates the best of both worlds with a simple, painted board and batten wall on the bottom and wallpaper on top! It’s not as hard as it looks – check out this quick tutorial!

Renter-friendly option: Removable peel and stick wallpaper will give you the same look without having to commit long-term. Love the board and batten? There’s a renter-friendly tutorial for that too!

5. Update Mirrors

Bathroom mirrors are often neglected, but they totally change the feel of the room – don’t leave them out! These wood-framed mirrors bring warmth to this bathroom’s design and help to balance out all of the cool tones and polished finishes. 

Renter-friendly option: If replacing your mirror is out of the budget or you’re renting, adding a wood frame to an existing mirror is an easy one-weekend DIY project – just make sure you can easily remove it if you’re renting!

6. Paint Your Cabinets

Painting your bathroom cabinets may take a little effort, but it’s a great way to unify your space or to add a fun pop of color your bathroom. With just a small can of paint and some time, you can take your bathroom from basic to beautiful, even with a low budget. This bathroom’s painted cabinets help to ground the space, and provide much-needed contrast that takes the design from bland to balanced.

7. Replace Old Light Fixtures

Replacing a ceiling or wall light in your bathroom with a modern fixture that’s more your style will give the entire room an instant style boost! You don’t have to play it safe here – find a fixture you love and jump in! We love the way this bathroom shows some serious creativity with these pendant lights that highlight this AMAZING wood accent wall. 

Many homeowners are wary of swapping out light fixtures, but it’s usually a pretty simple DIY. We recommend starting with your vanity light first if you’re on a budget – great front-facing light by the mirror will make the biggest impact on your morning routine!

8. Layer Your Light

Every room in your house should have several light sources to make it feel more comfortable and eliminate harsh shadows and dark corners. In a living room, that’s as easy as tossing in a few lamps, but layering light in a bathroom can be a little trickier.

This bathroom uses a combination of pendant lights and recessed lights to make the whole space feel bright and airy. If your bathroom lighting isn’t working for you, installing an extra wall or ceiling light is the best way to go from dark and dingy to light and bright. 

If your bathroom’s already finished and rewiring isn’t in the cards – don’t worry! Fortunately, there are a lot of easy do-it-yourself options out there. 

LED light strips like the ones in this bathroom are inexpensive and as easy to install as a sticker! They’re usually used behind the mirror or under cabinets, but they can go anywhere you want some extra light. 

You can also replace a light switch or outlet cover with one that has a built-in light – no more blind fumbling for a switch in the middle of the night.

Renter-friendly option: Get a motion-sensing plug-in outlet light or a rechargeable countertop light! These are both non-permanent ways to add a layer of light and keep yourself from bumping into the counter in the dark.

9. Update Faucets

Another way to update the look of your bathroom and conserve water is by switching out your faucets. Look for a faucet with a WaterSense label to reduce your sink’s water flow by 30 percent or more. Less water flow means a lower water bill. With a lower water bill, you’ll have some extra change in your pocket to take your family out for dinner (or yourself–you deserve it!).

10. Dim the Lights

The lights in this bathroom make it a retreat from chaos. When you want a calming bath, dim the lights for optimal relaxation. Dimmable lights give you the flexibility to turn your bathroom into a spa.

Bonus points: Since dimmable lights are more energy-efficient, installing a dimmer switch will leave you with extra money to do more with your bathroom!

Renter-friendly option: Use other lower-light options like strip lights, countertop lights, or LED candles like in the bathroom above.

11. Add a Backsplash

The metallic accents and painted vanity in this bathroom are to die for, but what really makes this space magic is that classic backsplash. Not only does it breathe new life into this space, but it also protects the wall from moisture and staining, so you won’t have to worry about mold or mildew. With a little DIY magic, this bathroom feels complete!

Renter-friendly option: Use a peel and stick backsplash instead! It’ll look like tile without actually being permanent.

12. Update Your Tile Floor

While tile may be a bigger time or money investment, this bathroom clearly shows that it pays off. If you’re wanting to update the floor, choosing a unique tile like this is the way to go. Pro tip: while real tile will give you the best result, you can actually use a stencil to paint your floor. It will give it the same look for a fraction of the cost!

Renter-friendly option: Use removable flooring (peel and stick) to look like custom tile, or cut a vinyl piece to fit the size of any existing tile.

————–

Don’t let your bathroom fall between the cracks any longer! When you’re ready to take it to the next level, give our experts at Western Chandelier a call. We’d love to help you get started and give you more tips like these.

Filed Under: 2023, Bathroom Lights, Styles & Trends

« Previous Page
Next Page »

Copyright © 2026