• Skip to primary navigation
  • Skip to main content

Western Chandelier

  • Buying Guides
  • Styles & Trends
    • Bathroom Lights
    • Ceiling Fans
    • Ceiling Lights
    • Lamps
    • LED Lights
    • Outdoor Lights
    • Smart Lights
    • Wall Lights
  • Wellness & Safety
  • Shop Products

Styles & Trends

How Many Blades Does Your Ceiling Fan Really Need?

How Many Blades Does Your Ceiling Fan Really Need?

by admin · Jun 28, 2023

Ceiling fans are great at providing comfort year-round. A good ceiling fan will help you save on energy costs by circulating the air in your home. In the summer they create a draft, making the room feel cooler. In cold weather, you can switch the fan’s direction to circulate warm air from central heating around the room. 

Ceiling fans are so ubiquitous that for many people it’s hard to imagine life without one! So what happens when your fan breaks, and it’s time to get a new one? 

If you’ve shopped for ceiling fans recently, you know that there are a lot of options. From the ultra-modern models with a single fan blade, to the “windmill” design fans with so many blades that there’s hardly any space between them – many homeowners on the hunt start to ask: 

How many blades does my ceiling fan really need? 

Does the blade count actually change anything, or is it just for aesthetics? 

In short, the answer is “yes to both.” The blade count on a ceiling fan is largely viewed as a style issue, but it does impact the way the fan works. Apart from the obvious design differences, the number of blades on a fan will also affect its noise level and energy consumption. 

Noise Level

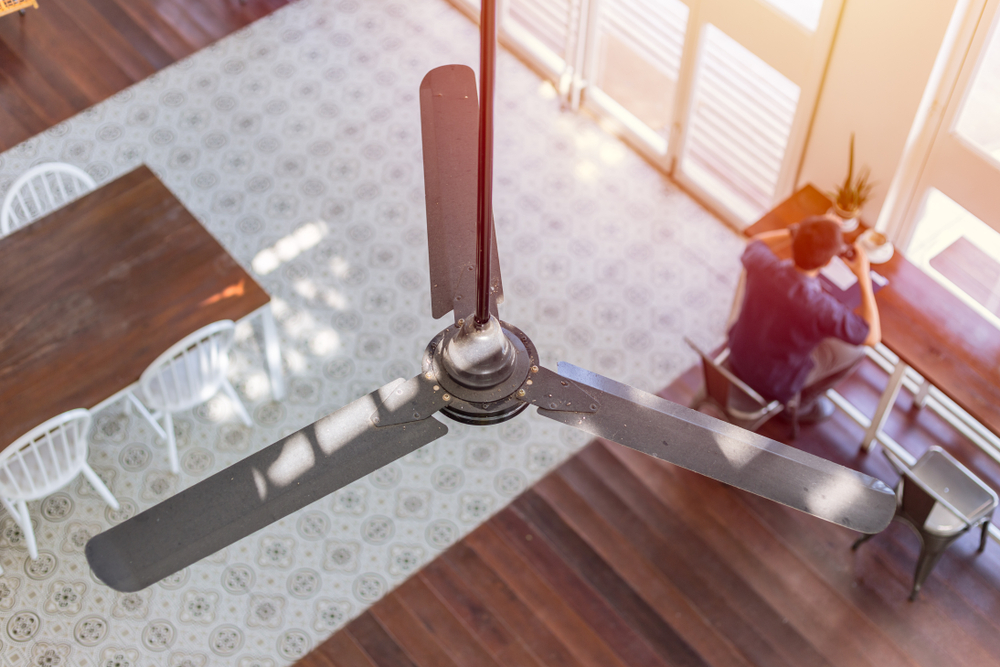
The fewer the blades, the faster a fan needs to spin to move the same amount of air. Lots of spinning means lots of moving parts, which usually translates to more noise. Take large industrial fans, for example – they typically have two or three blades and are pretty loud. 

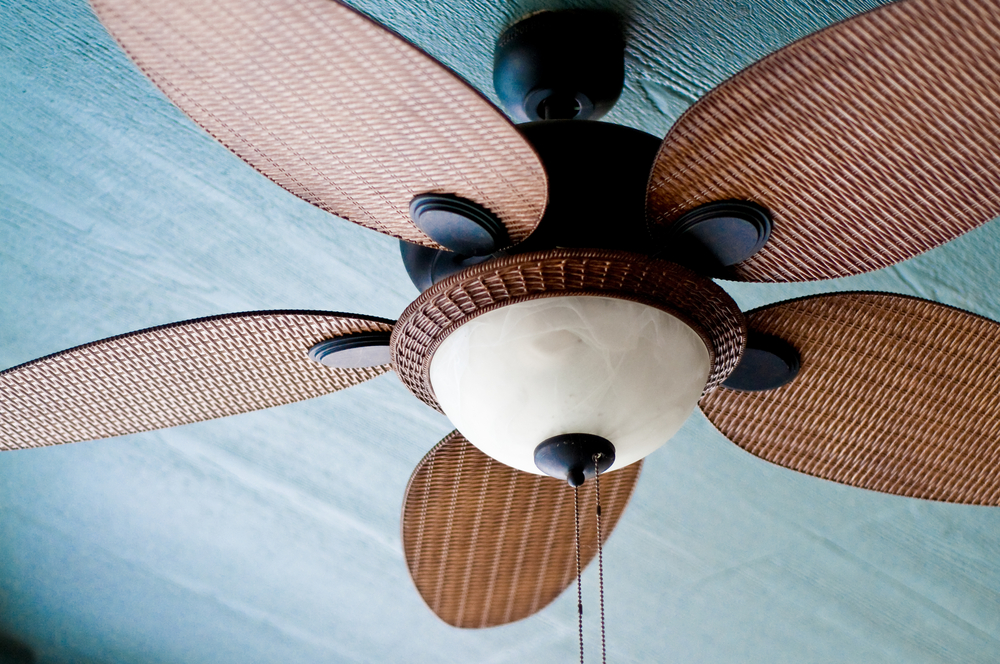
On the other end of the spectrum, fans with higher blade counts can move a lot of air spinning at a slower rate. Less motion means less noise – windmill-style fans with eight to ten blades are virtually silent. 

There isn’t an exact cutoff between noisy versus quiet fans, but a good middle range is around five. If you want a quieter fan, one with five or more blades will likely be your best choice. 

Energy Efficiency

Another thing to consider when choosing a fan is how much it will cost to run. Fans with more blades create more drag, requiring more energy to operate. This is one reason why large, always-on fans (like you’d see in a commercial space) often only have three blades. They may be a bit noisier, but they save on energy costs.

While its blade count does impact the energy efficiency of a fan, it’s definitely not the only factor involved. The efficiency of fans can also be affected by the length and angle of the blades and by the type of motor it uses. It’s best to check the energy rating of your fan when possible. 

Style and Aesthetics

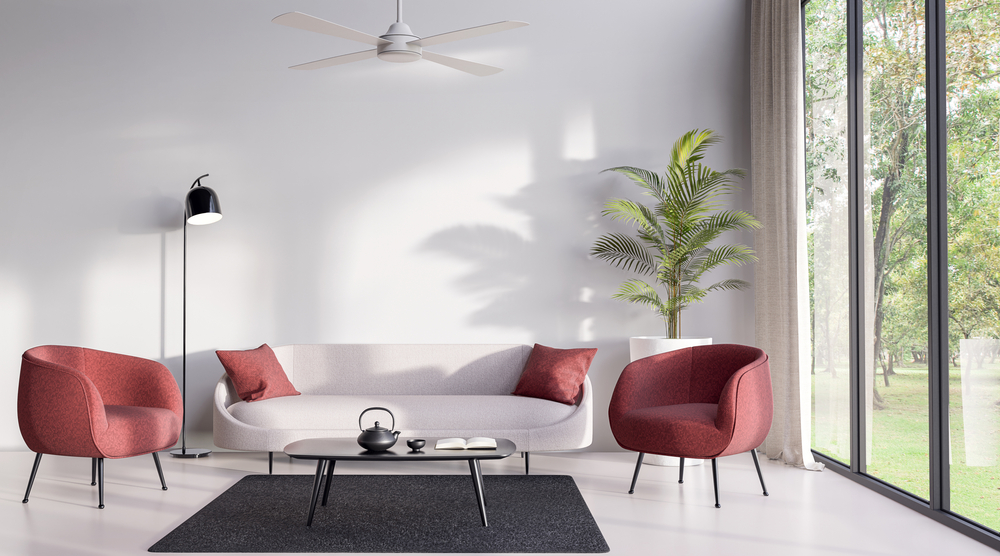
Aside from energy efficiency and noise level, the main difference between fans with high and low blade counts is really just style and aesthetics. “Windmill” styles with eight to twelve blades can feel rustic, whereas fans with two to three blades usually feel minimalist and industrial. 

How do I know what the right number is for me?

The short answer to this question is – it really doesn’t matter very much for most people. It doesn’t matter whether noise levels, energy efficiency, or aesthetics are your top priority; it’s pretty likely that you’ll be able to find a fan that will meet your needs in all three categories. 

Most often, it’s safe to shop by your style preferences first, then find a fan that meets your noise and efficiency needs from that selection. A modern, high-quality ceiling fan will be designed to work well regardless of the blade count.

If you’re looking for a quality fan that will keep you cool for years to come, stop by our showroom or give us a call. Our lighting experts are ready and waiting to help you find exactly what you need!

Filed Under: 2022, Ceiling Fans, Informational

Homeowner’s Guide to Backyard Lighting

Homeowner’s Guide to Backyard Lighting

by admin · Jun 7, 2023

Whether it’s a quiet family dinner or a formal party, the backyard can be a perfect hosting space. Kids have room to run around, hosts can invite more people, and no one has to vacuum at the end of the night. But when the sun starts to set – you’ll want to have thought ahead about how you can keep the party going without having to move inside.

Before you get started, take a minute to think about how what purpose your lights need to serve. Your outdoor lighting should be intentional and useful, not just a hodge-podge of tiki torches and solar-powered spikes. Balance is important – the right lighting will make your yard cozy and inviting. Not enough light and you’ll be tripping in the dark, too much light and it can create disorienting shadows, or lead to complaints from neighbors.

To help you get it just right, we’ve put together a few tips and tricks to help you put together your next backyard BBQ.

Stair and Floor Lights

The deck or patio area is central for meals or small-group gatherings. One popular approach to deck lighting is using stair lights. Not only are they elegant, but they also provide an important safety feature. They light the space gently without being distracting, and they make steps easy to see in the dark.

You can also install smaller lights on the floor of your deck. These lights can help brighten up corners and can also make your space safe when it’s dark outside.

Recessed Patio Lights

On covered decks and patios, recessed lights are a great option. They’re installed up inside the ceiling, so they’ll be well-protected from the elements. From a design standpoint – they’re the perfect choice to provide your patio with even all-over light that doesn’t get in the way of the view of your backyard. Make sure you double-check before you buy, not all recessed lights are rated for outdoor use.

String Lights

String lights are wildly popular – and for good reason. They are fast and easy to put up, and their effect is magical no matter where you put them! You can attach them to the exterior of your house, a deck railing, or anything tall enough to set them up overhead.

If you don’t have a patio or deck area, they can be strung on posts around a firepit, along a fence, or even in the trees and bushes surrounding your entertaining space.

Landscaping Lighting

You can use landscape lighting to show off the best features of your yard, even after the sun has gone down. Just like stair lighting, landscape lights are multi-functional as a design element and a safety feature. Many people opt for solar-powered lights to brighten walkways and highlight design features, but you can also hire an electrician to hardwire these lighting elements to a light switch you can flip on and off from the comfort of your patio.

There are countless shapes and sizes of landscape light fixtures to choose from. You may want to consult with an expert to recommend what will work for your yard space. However, there are a few general principles to keep in mind:

  1. Don’t overdo it. Landscape lighting isn’t meant to mimic daytime, it should create just enough light to make the yard inviting at night.
  2. Consider safety. Lighting pathways is a must if you’re using your backyard after dark – but make sure you do it safely. Keep lights out of the way of where you’re walking so that they don’t become trip hazards. Motion-sensor lights near doors and on sheds are also an important safety feature that can deter theft.
  3. Choose your colors. White / daylight light will show colors just as they are during the day, but they can be pretty harsh. Yellow / warm / soft white light will give your yard a more cosy and relaxing feel, and it attracts fewer bugs.
  4. Timers are your friend. If you’re planning a one-time party it’s not a big deal to flip the switch on and off, but if you’ll be in your backyard daily, consider putting your outdoor lights on a timer so that you won’t have to remember to flip them off before bed.
  5. Look into LED. These bulbs may cost more upfront, but they’ll last much longer and use far less energy.

Your Backyard Plan

Western Chandelier’s showroom offers a great selection of outdoor lighting options, and our lighting experts would love to help you plan your backyard entertaining space and find exactly what you need. Stop by our showroom and see it for yourself, or check us out online and we’ll help you get started. 


Filed Under: 2022, Outdoor Lights

Design Trend Inspo: 70s Retro Lighting

Design Trend Inspo: 70s Retro Lighting

by admin · May 24, 2023

The bold prints, color pops, and unique shapes of the 70s are here again, and we can’t get enough! Modern takes on 70s design may be a little less harsh, but they still have plenty of the iconic warm colors, funky fixtures, and unexpected choices.

If you’re looking for fun ways to inject a little bit of personality into your home’s design, look no further than these adventurous, retro-inspired interiors!

Warm Colors

What could be more 70s than orange and green? While 1970s interiors were overwhelmed with avocado green, harvest gold, and burnt orange, today’s retro-inspired decor stays more neutral, bringing in pops of these retro colors with accent pieces throughout the space instead.

In this 70s-inspired living room, the orange lamps add a fun pop of color next to a mid-century style table and green couch. Paired with a neutral white wall and wood floor, the colors feel bright and fun without being overdone. 

These soft neutral creams and tans, combined with natural materials, set off this fun bright orange lamp in a way that perfectly balances modern and retro in one comfy space.

Pro Tip: If orange, tan, and green aren’t your thing – keep reading! There are a lot of other ways to incorporate this fun and unique style!

Geometric Silhouettes

Nothing says “style” like a unique lamp in a funky retro shape. These geometric designs create fun silhouettes, and they’ll go with anything!

Pendants lights were a permanent fixture of the 70s. These lantern-style pendants look like they could have been taken right out of the disco era! The calm, neutral color deftly balances out the busy, varied shapes and lines.

This curvy pendant light brings back the groovy vibes of the 70s, but with sleek modern finishes.

Some fixtures demand your attention the moment you enter the room, like this asymmetrical design that can’t help but be noticed. The round curve at the top is also a trademark of 70s decor. 

Domed Tops

Rounded tops scream “retro”. Finding fixtures with a domed shape is a great way to add a subtle touch of retro to any room.

This cream table lamp’s rounded metal shade gives off subtle 70s retro vibes without distracting from the calm, neutral design. 

These domed silver pendants bring an unexpected mix of modern and retro designs to this otherwise very neutral space. Their curves help to balance out all of the harsh straight architectural lines in this space to make it feel more welcoming. 

This domed top is easy to find in a wide variety of fixtures from lamps to pendants – and in a wide range of colors and finishes. You’re sure to be able to find one that matches your room while giving a subtle nod to the 70s. 

Pro Tip: Domed fixtures don’t need to be basic. Don’t be afraid to look for unique designs and textures that match your space! 

Modern Twists

One trick to finding 70s-inspired lighting is to find fixtures that incorporate retro and modern touches in the same piece. 

These modern pendants give a slight nod to the 70s, but live in 2022. Their modern, sharp lines and matte black color are right at home in this minimalist earth-toned room, while their retro, curvy, geometric shapes warm up the space. 

These retro-inspired pendants have a modern industrial vibe. The brushed metallic gray tones complement the cool green decor, and their unique shape and design are a great conversation starter! 

This bold pink room carefully balances several modern and retro elements, which makes this rounded pendant in a bright, modern pink finish a perfect fit.

Think Outside of the Box

Outside-the-box thinking is another hallmark of 70s style. Retro-inspired lighting often includes using lights in a different or unexpected way. 

This wall has all the 70s colors and shapes we know and love. Neon lights give off a strong retro ambiance – but they can break easily. Modern takes on this trend use LED lights, which last much longer. 

This unusual fixture is another perfect example of thinking outside of the box. We love how this light’s unique shape and placement make an understated yet bold addition to the room. (Anyone else want to relax here with a good book?)

Pro Tip: Don’t let the fear of making a design mistake stop you from taking a risk! Some of the best designs happen when you’re willing to let go of convention and try something new!

—————-

One of our favorite things about 70s Retro Design is that there’s something for everyone. From the bold, funky, and adventurous maximalist to the subtly nostalgic minimalist, anyone can spice up their home with a little bit of 70s funk! 

—————-

Ready to join the disco-lovers of the past? Stop by our showroom or give us a call to see what retro-inspired lighting can do for your home!

Filed Under: 2022, Styles & Trends, Styles and Trends

How to Choose the Right Bathroom Vanity Lighting

How to Choose the Right Bathroom Vanity Lighting

by admin · May 17, 2023

When done right, your bathroom lighting should be able to take you from a bright morning routine to an evening spa break to a midnight trip to the restroom without feeling too over or underpowered in any scenario.

Most builder-grade vanity lights just don’t cut it. They’re often too high, too bright or dim, and don’t really add much to the design of your bathroom. So if you’re ready to try something new, we’ve compiled a list of the most common vanity light fixtures to help you figure out precisely what you (and your bathroom routine) need to create the bathroom oasis you deserve. 

Here is a short list of light fixtures and bulbs to consider so that you’ll be prepared to balance the functionality and style according to your budget and available space.

Types of Vanity Light Fixtures

Your bathroom vanity includes the mirror, counter, sink, and surrounding lighting. Vanity lighting is often the only source of light in the bathroom – and it largely determines your experience there. So it’s important to get it right!

There are several types of vanity light fixtures, each with its own set of benefits. Which one you choose is up to you – but make sure you consider both style and function to make sure you’re happy with the result.

Vanity Light Bar 

Light bars are the most common fixture for bathroom vanities because they’re easy to install and give off a lot of light. Light bars consist of a long base (the bar) with light emanating from its entire length. They’re usually mounted just above the mirror from a single, central wiring box. 

Most people picture a base with multiple bulbs sticking out into the room, like you’d see in a “builder’s grade” new home or surrounding the mirror in a makeup artist’s studio. Other light bars consist of a single, long light source, such as a sleek LED bar or a fluorescent tube. 

The advantage to installing light bars is that they create even lighting with fewer shadows. (Anyone who’s ever done makeup or shaved using a bathroom mirror knows how important that is!)

Pro tip: The most crucial part of successfully using a light bar is getting the proper proportions. Ensure the bar is at least 75% the mirror’s width and never longer than the counter below. Keeping the bar at least 6-6.5 ft high will give even light without shining directly into your eyes. 

Mirror-framing Sconces 

Sconces are light fixtures that attach to the wall rather than the ceiling. They’re often found above the center of the mirror, although it’s worth considering placing your sconces on either side of the mirror– you’ll get the best light for your morning routine and playfully break from tradition! 

The number of bulbs and types of shades will impact your placement. Some shades only allow for downward light, so those work best up high. Glass shades are a little more forgiving – they’ll shine light on your face when installed above or to the side of the mirror. 

Not only are sconces an excellent fit for lighting your vanity, but they also make a statement. You’ll show that you put real thought into your bathroom design by using a non-traditional fixture.

Pro tip: We recommend mounting sconces with the center of the fixtures about 60″ high and about 28″ apart. Try installing one on either side of your mirror to get even, shadow-free light on your face as you’re getting ready.

Unexpected Pendants

If you’re looking for a way to make your bathroom look unique, try out pendant lighting. These fixtures hang directly from the ceiling, with the bottom of the shade right above eye level. Not only are pendants a bold statement, but they’re also a versatile option if you’re short on space.

In a bathroom, sconce and pendant placement guidelines are very similar. A single pendant directly over the mirror is an excellent option for small bathrooms. They also work well as a pair, framing the mirror on either side. 

Because pendants have an extra “wow” factor, they’re also sometimes used in larger groups to create a design element. For example, this designer hung multiple pendants along the mirror – and we think it turned out great!

Pro Tip: We recommend spacing your pendants about 30 inches apart to avoid harsh lighting. Also, keep in mind the pendant’s ability to shine directly onto the mirror– a thin or transparent shade will reflect a lot of light. It’s a good trick to make your space feel brighter but may cast unexpected shadows.

Modernize with LEDs

For a modern (and energy-efficient) touch, consider opting for LED lights. They last for years, cost little to run, and come in a wide variety of color options.  LED light bulbs can be installed in almost any fixture in place of a traditional bulb.

Some light fixtures come with LED lights already integrated, which means you’ll never have to change a bulb for the life of the fixture. While these mirrors come in a variety of styles, they’re most often found in sleek, modern bathrooms with a minimalist feel. 

LED strip lights may be an unexpected choice for the bathroom. They’re easy to install (some are even peel-and-stick!) and will make your bathroom feel high-end with just a little bit of creativity. As vanity lighting, try installing them behind a mirror to give a soft, luxurious glow. 

Pro tip: Because they are so small, LED strip lights can be tucked in unexpected places, like along the underside of a mirror to light the counter, or along the bottom of a floating vanity to light the space underneath. Adding light to dimly-lit edges and corners of your bathroom will make it feel bigger!

When to Hire a Pro

If you own a newer home and have tools handy, you can probably handle most light fixture upgrades yourself. But not all fixture update projects are created equal. For example, you may have an older home that requires electrical updates, don’t own tools, need new circuits for new fixture locations, or simply don’t feel comfortable with an electrical project. 

Electricians will ensure your new fixture is installed quickly and safely. Not sure how to hire a qualified electrician? No problem! Your local lighting showroom can often connect you to a great pick– and offer a wider selection of fixtures while you’re there!

Ready to update your bathroom vanity? The experts at Western Chandelier can help you find the right fixture for your room, budget, and style. Contact us today!

Filed Under: 2022, Bathroom, Bathroom Lights

Ceiling Fan Terminology Explained

Ceiling Fan Terminology Explained

by admin · May 10, 2023

A Helpful Glossary of Common Ceiling Fan Terms

If you’re shopping for ceiling fans and it’s starting to feel like the descriptions are written in code, don’t worry! We’re here to solve the mystery with a list of basic terms you’ll need to know when looking for the right ceiling fan.

Ceiling Fan Types

Ceiling fans are most often categorized by their motor type, mount type, and/or weather rating. 

Motors

AC and DC Motors

AC motors (alternating current motors) are the most popular ceiling fan motor. They’re typically less expensive than DC motors, which is great for budget buyers. They are relatively energy efficient, are very reliable, and come with around three to four different fan speeds. 

DC motors (direct current motors) are a newer technology and often use a remote instead of a wall switch. DC motors make a quieter, more powerful fan with more speed options and are more efficient than AC motors. 

Dual Motor

Dual motor fans have two adjustable fan heads attached to a central motor. Each head is adjustable to its own speed and angle. 

High-Velocity Motor

A high-velocity fan is a powerful fan. It produces a higher-than-normal amount of airflow, providing you with a stronger breeze. 

Mounts

Downrod/Shank/Extension Rod

The multiple terms for this accessory are purely regional, and all mean the same thing– the rod or bar installed between the ceiling and the fan. Downrods can be used in many rooms but create the most impact in rooms with high ceilings. Not only do they pull the eye upwards and make the room feel bigger, but they also bring the air circulation closer to you.

Standard Mount

This type of mounting system is for level ceilings. Standard mounts usually come with a 3- to 5-inch downrod, so the fan slightly hangs down into the space.

Hugger or Flush Mount

These are perfect for low ceilings and tall people. Huggers are mounted against the ceiling and don’t use a downrod. Depending on the ceiling height, huggers or flush mount fans can help the ceiling seem higher while keeping your air circulated and fresh.

Low-Profile Fan 

For a fan to be considered low-profile, it must hang down less than 12 inches from the ceiling. Most low-profile fans are flush mounts, but some fans with short downrods are small enough to qualify as low-profile as well.

Sloped Mount 

A sloped mount is a mounting system that includes a downrod that allows the ceiling fan to be installed on a vaulted or slanted ceiling. The base is designed to let the downrod and fan hang at an angle when mounted so that the fan will be perpendicular to the floor.

Rating

Wet Rated or Outdoor Rated Fans 

Outdoor or wet rated fans are designed to withstand direct contact with rain and snow. Carefully read the packaging of your outdoor fan because not all fans can handle the same weather exposure. If you live in a particularly wet or stormy area, you’ll need a tougher outdoor fan.

Industrial and Commercial Fans

Industrial fans have powerful motors and curved blades, and they can run continuously, making them ideal for large, open areas like warehouses and gyms. Commercial fans are heavier-duty than standard fans and more aesthetically pleasing than industrial fans. They’re commonly found in schools, businesses, and restaurants.

Ceiling Fan Measurements 

This section covers the most common measurements used to describe a ceiling fan’s function and size.

Airflow (CFM)

Cubic feet per minute (CFM) refers to the amount of air moved by a ceiling fan, using the amount of air moved per cubic foot in one minute as the metric. The higher the airflow a fan uses, the more efficient your home can be as you recycle heated or cooled air. According to Energy Star, 75 CFM is the minimum airflow of an efficient ceiling fan.  

Blade Pitch 

The pitch measures the angle of the blades compared to the ground. Fan blades are slightly angled to push the air around. (If they were parallel to the floor, they wouldn’t do much!) The angle of blade pitches typically ranges between 10 and 25 degrees, but the most efficient is from 10 to 15 degrees. 

Blade Sweep or Span 

A fan’s sweep or span measures the diameter of the circle created by the blades. You’ll need to know the span of your fan to make sure it will fit properly in your room – if it’s too large it could scrape walls or snag curtains. On the other hand, it may be distracting and look out of place if it’s too small.

Motor Speed (RPM)

Revolutions per minute (RPM) refers to the speed of the blades as they rotate, measured by how many times the blades make a complete circle in one minute. High RPM fans move more air than low RPM fans of the same size, making them more efficient. 

Watt Equivalence

Some fans will require more electrical power (watts) than others, so it’s essential to have a good understanding of how much strain your new fan will put on the existing circuit. A good rule of thumb is the longer the fan blades, the more watts it will use. Expect your fan to use 55 to 100 watts.

Weight

Residential ceiling fans typically weigh anywhere from 8 pounds to 50 pounds. Keep in mind that lightweight ceiling fans are designed to hold their weight alone. You should never add anything to a ceiling fan that wasn’t in the original kit without carefully reading the manufacturer’s instructions. Some ceiling fans allow for customizable light kits. In that case, be sure to check the packaging for how much additional weight it can hold.

Number of Speeds

Most ceiling fans will have multiple speed settings so that you can control the amount of airflow and circulation in your space. Most fans will have three speeds (slow, medium, and maximum speed). You’ll also want to see if your fan can reverse direction– this will help pull warm air down from the ceiling during the winter and help to cycle your heated air.

Dimensions

You’ll need to check several measurements to ensure your fan fits correctly in the space. For example, both depth and width can refer to the blade span (or the size of the circle the fan will make). The width can also describe how wide the individual blades are. Finally, as mentioned earlier, the downrod is the pole that connects the fan to the ceiling mount. Together, these three dimensions will tell you how much space the fan will take up.

Pro tip: All fans are designed for specific square footage, meaning that some are designed to push air through large rooms while others are for small rooms. Fans designed for bigger spaces would be disruptive in a smaller room (and vice versa). The packaging of your fan will tell you the intended size of the room, so make sure to check the square footage of the intended space and match it to the appropriate fan. 

Parts and Accessories 

The final section describes potential upgrades and customization options to consider while shopping for your ceiling fan.

Light Kits

Many fans come with a light fixture attached (called an integrated light), but some can be purchased and attached depending on the fan. There are three different light kits that you can use with your fan: uplight kits which sit on top of the fan and point upwards, branched or stemmed kits use globes or shades that point up or down, but the most common light kit is the bowl or shade kit which attaches to the bottom of the fan. Keep in mind that some ceiling fans with an integrated light may not include a bulb– you may need to purchase bulbs separately.

Remote Control

Many fans available today are remote control or smart-home compatible. A remotely controlled fan may seem like a luxury, but it’s also very practical – especially for those with extremely high ceilings! Depending on the model and features, you’ll be able to adjust the lights, fan direction, and fan speed with ease. 

Reversible Blades 

Some fans allow for their blades to spin either clockwise or counterclockwise. This functionality helps to customize airflow according to the season. For example, the blades should turn counterclockwise in the summer to push the air down (a downdraft), providing cool breezes.  The fan blades should rotate clockwise to pull air upwards (an updraft) in the winter, efficiently recycling heated air without cooling the room. You can either toggle the switch on the fan or use a remote to change the direction of the blades. 

———————-

Ready to switch out your builder-grade fan or install a new one in the place of an existing light fixture? Now that you have a reference to all of the features and parts of a ceiling fan, you can shop confidently.

If you’d like additional information, a professional opinion, or installation assistance, contact the experts at Western Chandelier, and we’ll make sure you get exactly what you are looking for! 

Filed Under: 2022, Buying Guides, Ceiling Fans, Informational

Nature-Inspired Lighting for Indoor Spaces

Nature-Inspired Lighting for Indoor Spaces

by admin · Mar 29, 2023

Eco-friendly. Plant-inspired. Natural colors. These well-loved decor trends are giving homes across the world a breath of fresh air by inviting the outside in.

Whether you take care of an army of plant babies or, if your green thumb skipped a generation, you prefer to use nature-inspired shapes, colors, and materials in your design, you’re sure to get some ideas from these beautiful nature-inspired interiors!

Use Your Houseplants 

What better way to make your space feel alive than bringing in something that’s actually alive? If you’re willing to get creative, your indoor lighting and your house plants can work together in tandem to make a design statement that will literally bring life to your space.

These minimalist bulb lights illuminate plant displays while blending in with the scenery. These industrial lights feel elegant and natural hanging alongside leafy plants and mini terrariums. 

Hanging lights can be combined with natural light from outside as well. This beautiful, open space is accented with simple hanging bulbs. The bulb pendants are long enough to reach eye level, but the cords blend nicely with other lines in the room.

These industrial-feeling pendants show a creative adaptation of a plant and light combination. Vines hanging from the ceiling are an unexpected accent to a warehouse-style ceiling. The vintage pendant lamps tie everything together. 

You don’t have to have a lot of surface area to add life to your space. This light fixture doubles as a plant stand, creating a natural, rustic, multi-purpose conversation starter. 

Find Nature-Inspired Lights

If the thought of keeping a bunch of house plants alive gives you hives, not to worry! Instead of tucking your lights amongst your plants, find light fixtures that echo the shapes and textures of the natural world. They’ll give you a great conversation piece and require zero watering.

Here’s a natural take on a pendant light. A string of white bulb lights wrapped around a tree branch adds a little fairy magic to a simple, gray room. It’s suspended from a cable in the ceiling to create a “floating” effect. 

This chandelier is a modern take on the tree-branch concept. The multi-directional placement of the bulbs, along with its earthy copper color tones, gives off natural, modern vibes.

You can find some creative, colorful lights patterned after plants. This vibrant LED wall light makes a statement on a plain white wall. Not only are they a fun pop of color, but LEDs are also energy-efficient — it’s a green double-win. 

Emphasize Natural Colors

What better way to bring the outside in than with a natural color palette? Greens, browns, and blues are staples in the interior design industry for a reason! But – any natural color palette works here. Snap some pictures of the world outside your door, or find a picture of your dream destination, and then head to a lighting showroom to find fixtures that match! 

Natural colors with accents of dark blues and greens are a great way to create an outdoorsy feel. This black and gold pendant light creates a perfect balance of color in front of a forest green wall.

These pendant spheres are also a great example. The gold and cream lights are soft, neutral, and subtle, which lets the room’s natural wood textures shine. 

Lampshades are also easy to find in natural colors. They add a beautiful, polished touch without being too busy or elaborate. This hanging lamp shade shows how beige can accent a room full of plants, wood, and other natural elements. 

These are some classic, basic lamp designs. Next to other, more eccentric lamp styles, they might not be noticeable. Next to a deep blue wall, however, they stand out. 

A green pendant lamp with a green wall and green furniture might seem like a lot, but it works. Having various shades of the same color adds a fun pop of personality. 

Include Natural Materials

Your light fixtures don’t have to be synthetic and industrial just because they’re connected to the grid. Natural materials such as rattan have come back in a big way. 

This cozy living room is filled with soft, natural materials. The wood lamp brings a natural warmth, and a bit of balanced structure, to this comfy space. 

Some other popular materials include woven straw, wicker, or bamboo. This woven shade is a gorgeous shape and color. It also lets enough light through to illuminate all the other natural features of the room. 

Woven shades are a great way to bring nature into your lighting. They illustrate that the size, shape, and color can vary based on the design of the room they’re going in. They can also be paired up to add another layer of design. 

Ceramic is a beautiful natural material for a light fixture. These two domed ceramic pendants give off a warm glow that’s perfect for a cozy dinner.

—————–

Drawing inspiration from nature to decorate our homes isn’t a new idea. It’s lasted for centuries because it works – we love to bring the outside in! There’s no right or wrong way to make it work for you, so find something you love and get started! 

If you’d like an extra hand finding just the right natural touch for your next lighting project, our lighting experts would love to help!. Give us a call, or stop by our showroom for the breath of fresh air that comes with a lighting update. 

Filed Under: 2022, Styles & Trends

Upgrading Your Lighting on a Budget

Upgrading Your Lighting on a Budget

by admin · Mar 14, 2023

All the Tips, Tricks, and Secrets You Need to Make Your House Shine on a Dime

If it’s been a while since you redecorated, your current home decor probably isn’t speaking to you anymore. When you’re short on time, updating the lighting is one of the fastest ways to make your home look, well, brighter. But, when you’re on a budget, replacing everything in the house just isn’t the right call. The good news is – you don’t have to! Here’s a few easy, creative, and budget-friendly ways to make your home feel bigger and brighter… without breaking the bank.

1. Swap Your Light Bulbs

Many people blame an old fixture for their lighting woes, when really it’s the bulbs to blame. Try swapping out your old bulbs with a fresh set of brighter LED bulbs!

While LED lights may cost more upfront, they use at least 75% less energy – which means they can give off more light and use less power. They also last up to 25 times longer than traditional light bulbs, so they’ll last for years before they need to be replaced. 

2. Do it Yourself

The cost of lighting installation can eat away at your budget quickly, but it can reduced if you’re willing to do a little research and put in some work. Installing lighting yourself can give you some extra cash to get lights you love.

Before tearing out any fixtures, educate yourself on the proper safety precautions! If you’re unsure about doing it yourself, don’t forget to budget for the professional help you’ll want!

3. New Shades, New Me

If your light fixture comes with shades – whether they’re glass, fabric, or metal – you might be in luck! Did you know you can replace the shades or globes on most fixtures that have them? A new set of shades is WAY cheaper than buying an entirely new light fixture, and it will make just about any fixture feel brand new again! With a like-new fixture, your space will match your style, leaving you (and your wallet) feeling happier.

4. Refinish Your Fixture

Another alternative solution to buying a new light is changing the finish of your existing fixture. With a little rub n’ buff and a handy youtube tutorial, your light will look totally different! This may need some touching up down the road, but when you need a quick fix to get you by until you can invest in a higher-quality fixture, a little DIY magic can help stretch your money. A little finish can take your fixture from outdated to updated while keeping your budget happy. 

5. Mirror, Mirror

In our opinion, quality lighting makes the biggest difference in a home, but adding mirrors can also increase light–if they’re well-placed. Hanging a mirror near a light or window can help reflect light, making the space look brighter and bigger. That reflected light can go a long way in lighting up a dim room!

6. Focal Point Focus

Another way to make your space look upscale is picking a more expensive light to be a focal point, while adding other less spendy lights to light up the room. The eye will be drawn to the focal point and won’t notice anything else! To start, install a chandelier to draw attention away from any existing recessed lights. Throw in a floor lamp where you need some extra lighting and–voilà! Your eye will be drawn to the chandelier, but the room will still be beautifully lit.

7. Add Lamps, Lamps, and more Lamps!

When in doubt, add a lamp! They’re cheaper, require little to no installation, and are a great design piece. Tabletop lamps make great decor for your tablescape and can light up a workspace. Floor lamps create a homey conversation area in a living room. Lamps are a super versatile, budget-friendly option to give just the touch of light you need.

—

We know that when you’re on a budget, every penny you spend matters! To be sure you’re spending all of them wisely, give us a call! We’ll match you with the best lighting solution for your budget and save you money so that you can get lights you love.

Filed Under: 2023, Bulbs, Buying Guides, Ceiling Lights, Lamps, Light Bulbs, Mirrors, Styles and Trends, Wellness & Safety

« Previous Page

Copyright © 2025